Webcam not working? How to fix your camera
We’re really doubling down on video calls at the moment. With the rise in remote working, video meetings, online presentations, and even video calls with family have become ingrained in our daily routine.
Unfortunately, webcam malfunctions are still one of the most common issues users experience. So, whether you use a Mac or a PC, and have an internal or external webcam, this guide will walk you through steps for troubleshooting and fixing your webcam, so you can show your face on screen again.
Scroll through the whole guide for general tips, or click one of the links below for guidance on your specific set up.
- Fixing internal webcams
- Fixing internal Mac webcams
- Fixing internal Windows webcams
- Advice for external webcams
General Strategies for internal webcams
If you’re using the camera that’s built into your laptop or computer, it can be difficult to target what’s actually causing webcam issues.
Before we get into Windows and Mac specifics, make sure you’ve tried all of the following:
1. Stop other apps from using your camera.
Zoom, Meet, Skype, Teams, Slack, Viber, Spike, WhatsApp, FaceTime, Photobooth - there are so many different apps with video conferencing capabilities, and we often have to juggle more than one to appease the various people in our lives. Switching between different platforms is usually fine, but if you forget to close one platform, you might not be able to get going on another one.
Here’s how to make sure all your other video call apps are closed:
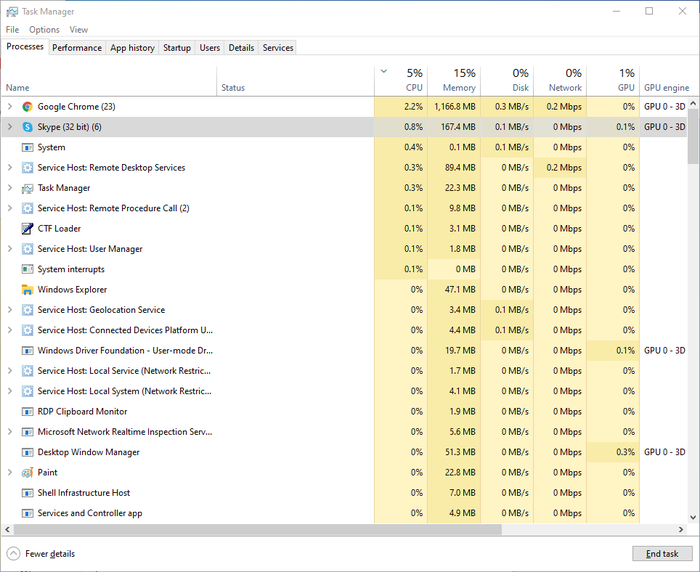
On a Windows PC, press Ctrl + Alt + Delete and open Task Manager. In the Processes tab, scroll through all the Apps you have running, and close any that might use your camera.
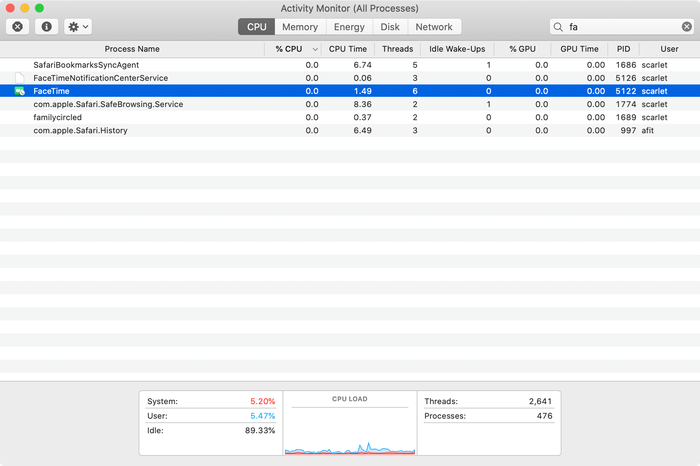
On a Mac, hold ⌘ Cmd + , type ‘Activity’ and select Activity Monitor to open. Double click on all of the apps that might be using your camera, and select Quit on the window that pops up.
If this doesn’t work, or you’re not sure which apps are using your webcam, you can close all of the running apps and try again. Make sure to save your work first!
2. Make sure your software is up to date (all of it)
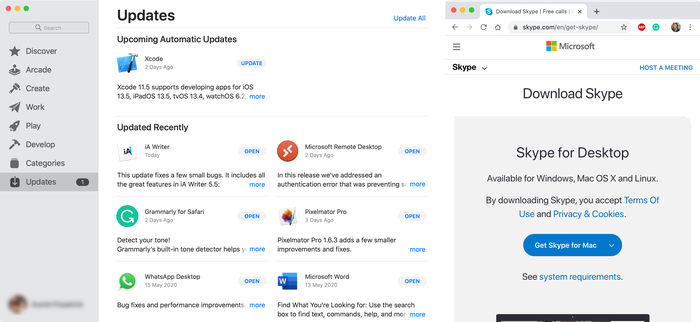
Check your computer’s software for general updates. Alternatively, if you find your webcam’s no longer working after a recent software update, check the app you're using, to see if the software needs updating to run with your current OS. You may have to reinstall the app to update the software. You can also update your webcam driver (more on this below).
3. Restart your computer
An oldie but a goldie. Sometimes your computer just needs a restart to get things working again.
Fixing Mac internal webcams
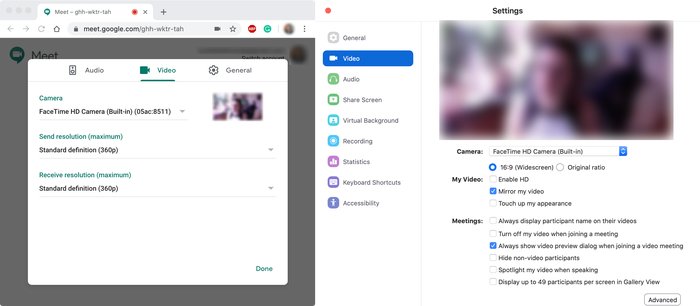
Internal webcams on a Mac (often called the “FaceTime” camera) include an extra wrinkle of complication, in that there’s no default camera settings app for Macs. As such, your camera’s settings are configured in various ways in each of your individual apps.
Force quit all video applications
If you don’t have the time or inclination for a reboot, you can try a force quit. Most users find this fixes their webcam issues, and it’s quick to do. Make sure to save any open projects before you do so.
- Quit all open apps that might try to use your FaceTime camera in your
Activity Monitor. - Hold
⌘ Cmd+, type ‘Term’ to openTerminal. - Copy and paste the following into terminal
sudo killall VDCAssistant, then hitEnter. - You might need to enter your administrator password at this point.
- Relaunch your video call app.

Reset your System Management Controller (SMC)
Resetting your Mac’s SMC can help if you’re experiencing issues with a variety of features, including power, charging and fans and camera issues. The method for resetting your Mac’s SMC depends on the type of Mac you’re using.
To reset the SMC on Macbooks that have Apple T2 Security Chip:
- Turn off your Mac.
- On your keyboard, hold the following keys for seven seconds (this may turn your Mac on):
⌘ Cmd+⌥ Option+⇧ Shift. - While still holding the three buttons, hold the power button. Continue holding all 4 keys for 7 seconds. If your Mac turned on, it will now turn off as you hold the keys.
- Wait a couple of seconds, then turn your Mac back on.
To reset the SMC on desktop Macs:
- Turn off your Mac.
- Unplug the power cable, wait 15 seconds, then plug it back in.
- Wait five seconds, then turn on your Mac.
To reset the SMC on all other Macs released 2010 or later:
- Turn off your Mac.
- Hold down
⌘ Cmd+⌥ Option+⇧ Shift. - While continuing to hold these three keys, hold the power button, too. Hold all four keys for ten seconds.
- Turn on your Mac.
Check for physical damage.
Physical damage is more likely to occur on a macbook than a desktop computer, due to the general wear and tear caused by transporting it. If you have an external webcam to hand, try using that (remember, if you have an iPhone, you can download Camo, our free app to use your iPhone as a webcam. 💁♀️).
Fixing internal Windows webcams
Run the “Hardware troubleshooter”
First, let’s find out if your built in camera is visible to your PC. To do this:
- Click start, then type
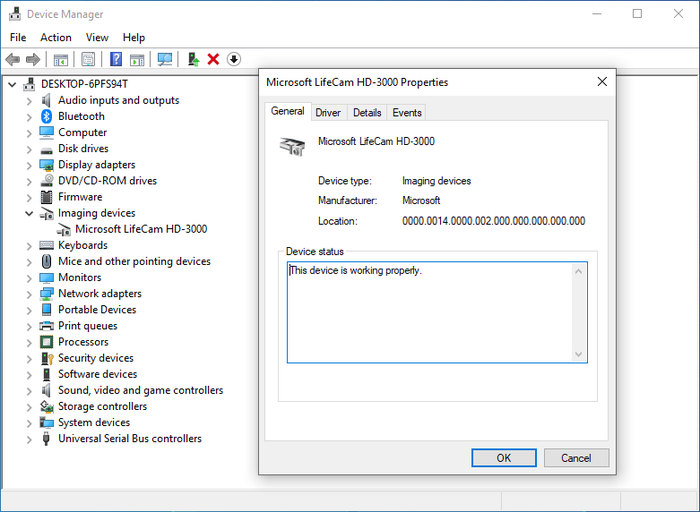
devicein the search bar to open theDevice Manager. You may need to enter your password, or provide administrator confirmation. From your Device Manager, find your webcam. It may be stored in a variety of locations, including
Imaging DevicesandOther Devices. In the screenshot below, we’re using an external webcam.![A webcam driver as seen in Windows’ Device Manager A webcam driver as seen in Windows’ Device Manager]()
A webcam driver as seen in Windows’ Device Manager -
If you can see your webcam listed here, double click it. If it opens and works, your problem is likely caused by a permissions issue, or an issue with your video app. More on this below.
- If you can see your webcam listed, but it still doesn’t work, try updating your driver.
Update your camera driver
- Click
⊞ Start, then typedevicein the search bar to open theDevice Manager. You may need to enter your password, or provide administrator confirmation. - Find
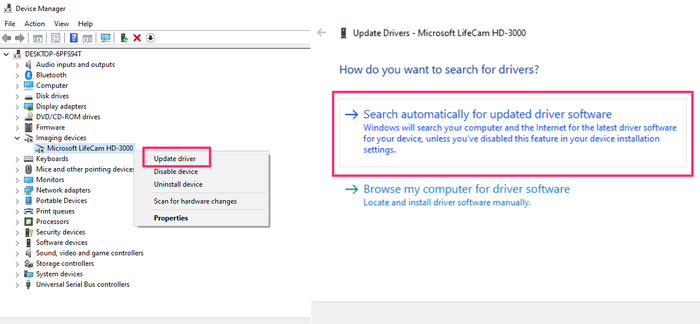
Imaging Devicesand expand to find your camera. - Right click your camera and select
Update Driver software Follow the instructions, and select
Search automatically for updated driver softwarewhen prompted.![Updating a webcam driver on Windows Updating a webcam driver on Windows]()
Updating a webcam driver on Windows -
If your driver cannot find an update, you can also uninstall and reinstall your webcam driver.
Give your video conferencing apps camera permissions
If your camera seems to be working until you come to use a specific app, make sure it has permission to access the camera.
- For general access, go to
⊞ Start→Settings→Privacy→Camera. - Under
Allow access to the camera on this deviceselectChange, then turn onCamera access for this device, and also turn onAllow apps to access your computer. - To grant camera access to specific apps, scroll down to
Choose which Microsoft Store apps can access your cameraand turn on the video conferencing app you’re trying to use.

External webcams
If you’re using an external webcam that connects to your computer via USB, the first thing to check is the USB connection.
Try switching to a different USB port, and if you have access to another computer, try plugging your webcam in there, to confirm there is no issue with the connection. If other computers also fail to recognize your webcam, the connection may not be working, or you may need to update the webcam’s driver.
Update your camera driver
To update your webcam driver on Windows:
- Connect your webcam to your computer.
- Click start, then type
devicein the search bar to open theDevice Manager. You may need to enter your password, or provide administrator confirmation. - Find your webcam in the list of devices.
- Right click your camera and select
Update Driver software Follow the instructions, and select
Search automatically for updated driver softwarewhen prompted.![Updating a webcam driver on Windows Updating a webcam driver on Windows]()
Updating a webcam driver on Windows
To update your webcam driver on Mac, you’ll need to go to the website of your webcam supplier and check for updates there. Here are the webcam support pages for the Microsoft LifeCam and for Logitech.
We hope this article helped. If you’re still experiencing webcam issues, take a look at our guide for improvising a webcam.
