The Overlay Editor
Overlays are a great way to customise your video with your brand or helpful information for your audience; and making your own is easy using Camo Studio's built-in editor and overlay gallery.
Overlay controls in Camo Studio
Overlay controls are located in the left sidebar of Camo Studio. You can view a collection of overlays from your library at a glance in the mini-gallery, and flip between different collections using the dropdown menu above it.
Click on any overlay to start using it on your video, or double click to edit it. You can also use keyboard shortcuts – ⌘ Cmd + 1, ⌘ Cmd + 2, and so on – to quickly switch between your top overlays.
Use the buttons below the mini-gallery to add or import new overlays, open the Overlay Gallery, or disable the currently in-use overlay.
The Overlay Gallery

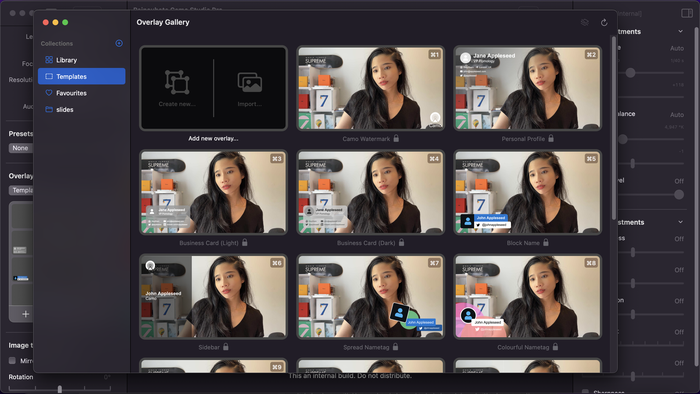
Camo Studio includes a gallery to help you keep your overlays organised. Just like in Studio's controls, you can use an overlay by clicking on it, or start editing it by double-clicking. Additional actions, such as favourite or delete, can be found by hovering over or right-clicking on an item.
The sidebar has three collections by default: - Library, all overlays from your entire library - Templates, overlays included in Camo Studio as standard - Favourites, overlays that you have favourited
Use the + button in the sidebar to add a new collection to your gallery, and rename or delete your collections by right-clicking on them.
You can move an overlay between collections by right-clicking on it in the gallery and selecting "Add to Collection" – or remove it from a collection by selecting "Remove from Collection".
In the top right corner of the gallery, you'll see a button to disable the currently in-use overlay and to refresh the preview image used throughout the gallery.
How to preview overlays before use
When it is opened, the Overlay Gallery will take a snapshot of Camo's video feed to use as a preview image for all overlays it contains. You can refresh this image by pressing the button in the top-right corner of the gallery window. This can be useful to gain a quick idea for which overlay to use without making it the active overlay in Camo.
To see a live version of an overlay in action, select it from the Overlay Gallery or the mini-gallery in Camo Studio's interface to enable it.
How to quickly create overlays using pre-built templates
From the Templates collection in the Overlay Gallery, double click on any overlay template to start making it your own. Once it's got a name, use the tools in the Overlay Editor to change text, rework shapes, apply your favourite colours, and add your icons or imagery to the overlay. Have some fun with it!
When you're done – or have run out of time – you can exit the editor and find your new, custom overlay saved in the Library collection.
How to create an overlay from scratch or make adjustments
You can create an overlay from scratch by clicking on the "Create new…" portion of the "Add new overlay…" item in the Overlay Gallery, or by click the + button below the mini-gallery in the main interface and selecting "Create new.." from the options. This opens the Overlay Editor with a blank slate.
How to export an overlay
You can share your custom overlays with other users by right-clicking them in the gallery and choosing "Export". Templates aren't exportable, as everybody already has these by default.
Camo's overlays are exported in a special format with the file extension .camoscene – in case you ever need to find one on your computer.
How to import an overlay
If you have received a new overlay to use with Camo, you can import it by clicking the "Import…" portion of the "Add new overlay…" item in the Overlay Gallery. Find the overlay file on your computer and choose it for import. The same can be done by clicking on the + button below the mini-gallery in Camo Studio's main interface.
Imported overlays are added to the Library collection by default.
How to create custom collections in the gallery
In the overlay gallery, click the + button in the sidebar and give your new collection a name. Then, start adding overlays to it or create a new one from scratch.
How to move overlays to a custom collection
You can move overlays between collections by right-clicking on one, selecting "Add to Collection", and then selecting the collection.
How to favourite an overlay
Favourite an overlay by hovering over it in the gallery (or mini-gallery) and clicking the heart-shaped button. Alternatively, you can move it to the Favourites collection directly.
The Overlay Editor

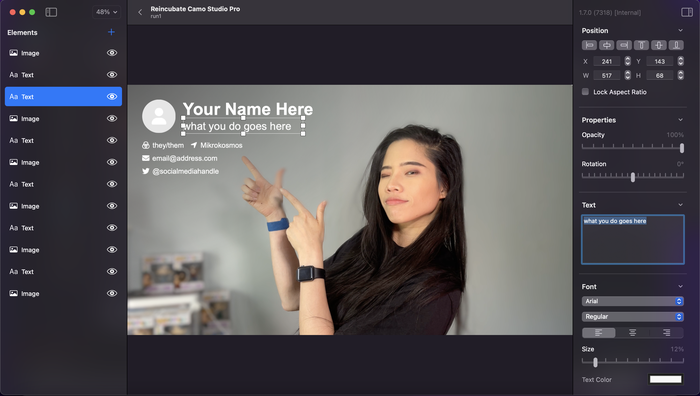
The Overlay Editor lets you compose and edit overlays right inside of Camo Studio. You may want to start by using one of Camo's templates as a starting point, or maybe updating the details in an overlay shared by a colleague; or dive right into creating one from scratch.
An overview of elements included in the overlay is shown in the left sidebar. An element is any text, shape, icon, or image that's been added to the overlay. You can add more elements by using the + button at the top of the sidebar, or remove and duplicate an element by right-clicking on it.
The order of elements in the list reflects how they will be layered in the overlay. An element that comes first in the list will appear to be on top of an element further down the list if they are positioned to overlap. You can reorder this layering by dragging-and-dropping items in the list, or by right-clicking on an element and selecting "Move Forward" or "Move Backward".
When you are done editing an overlay, you can return to the Camo Studio interface by clicking the back arrow in the top-left, or by hitting the Esc key on your keyboard.
How to add an element
The Overlay Editor includes four element types: text, image, rectangle and circle. To add a new element, click the + at the top of the left sidebar and select its type. The new element will automatically be selected so you can start editing its properties and move it to the position you want.
How to adjust and customise an element
When an element is selected, its details will be displayed in the inspector in the right sidebar. Here, you can fine-tune its alignment, position, size, and properties such as opacity and rotation.
You can also select multiple elements at the same time by holding ⌘ Cmd or ⇧ Shift and clicking on the elements you want to edit together. This makes it easier to move them as a group, align them relative to one another – such as centring two pieces of text – or adjusting properties of many elements simultaneously.
How to position an element
To change the position of an element you can simply select and drag it to where you want it in the editor. For more fine-grained adjustments, you can use the inspector to set exact values for the X (horizontal) and Y (vertical) coordinates of the element. Note, these coordinates are relative to the top left corner of the element.
An element can also be quickly aligned to the whole overlay, or relative to other elements if multiple are selected simultaneously, using the editor's alignment actions. This includes aligning to all four sides (top, down, left, and right) and horizontal or vertical centring.
How to change the size of an element
When an element is selected, side and corner markers will show over its bounding-box on the editor's canvas. These can be dragged to quickly adjust the size of an element. The W (width) and H (height) position attributes can also be set more precisely in the inspector.
The aspect ratio of an element, which is the ratio between its width and height, can also be locked in the inspector. This can be important when working with images or icons, as these may appear distorted otherwise.
How to bring an element backwards or forwards
As you add more elements to your overlay, you may end up with overlapping shapes, text, and images. The order in which these are layered is the same as their order in the left-sidebar overview: top-to-bottom in the overview corresponds to front-to-back in the editor's canvas.
You can adjust this order by dragging elements in the overview, or by right-clicking on them and selecting "Move Forward" or "Move Backward".
Adjusting element properties
The Overlay Editor lets you adjust a number of element properties to help you build the perfect overlay for your purposes.
All elements support adjusting opacity and rotation, while only images and shapes can have a border set. Finally, the fill colour of shapes can be modified.
- Opacity
- An element's opacity – the opposite of transparency – can be adjusted in the Overlay Editor's inspector, located in the right sidebar. This can be a useful effect for building practical overlays that present information without obscuring the underlying video entirely.
- Rotation
- To rotate an element, use the rotation slider in the right-sidebar inspector. This allows for a full 360° of rotation. If you want to set this to a specific value, click on the text specifying the current value above the slider.
- Borders
- Images and shapes can have a border set in the editor's inspector, with adjustable corner radius, width, and colour. A handy trick for creating circular icons from square images: set the corner radius to half the height of the element.
- Fill
- The fill, or inner colour, of shapes (rectangles and circles) can be set in the inspector. Use this to include your brand colour in overlays, and balance with element opacity and overlay text colour to get the perfect look for your overlay.
Working with text in the Overlay Editor
A key aspect of any overlay is the content. Text elements let you share information with viewers continuously, and pass on details that might not otherwise be part of the main content or conversation.
When working with text elements, we recommend considering the overall size and resolution at which your video is likely to be viewed and taking this into account when choosing text size, weight, and positioning.
The Overlay Editor makes all fonts on your computer available for use. When a text element is selected, you can edit its content directly on the editor's canvas or through the "Text" section of the inspector in the right sidebar. Similar to a text editor, you can adjust how the text is justified, its size, and colour in the "Font" section of the inspector.
Working with images in the Overlay Editor
Including your brand logo or custom iconography is straightforward using image elements. You can import these into an overlay from anywhere on your computer, and tweak them as any other element. We would recommend keeping the aspect ratio locked for image assets, to avoid distorting their dimensions.
Images have an additional section in the right-sidebar inspector, which allows you to swap out the file used in the image element, reset the element's size to the original image size, or choose between two scaling modes for the image.
Scaling modes define how the image changes as the element it is in is adjusted. "Aspect Fill" makes it so the aspect ratio of the image is conserved, but it may overshoot the sides of the element. "Stretch Fill" means the image is exactly the same size as its containing element, even if that breaks the image's aspect ratio.
