How to create a great background scene for live calls and videos

You might think that the way you look on calls matters more than your background, but this may not be true. A survey carried out by the Harvard Business Review found that while 60% of those surveyed cared about the background of webcam images, only 47% cared about the clothes that were worn.
Though the space visible behind you may seem largely irrelevant to the calls you join, it accounts for a large portion of your webcam image, and can influence how others perceive you.
Think about traditional portrait paintings. The background can be left blank, but the choice to fill it with items surrounding the subject is a conscious one, used by the artist to convey additional information which might be harder to convey in other ways, such as the outfit or expression of the subject.


Many of us feel some amount of apprehension about creating online videos of ourselves, particularly when they’re live. We don’t want to be confronted with our own image: it doesn’t feel professional enough, it creates Zoom fatigue, and makes us scrutinise our own flaws. But curated online video can also give us control, perhaps more control than we have ever had, over the way we present ourselves to others.
Our backgrounds and the scenes we can create are powerful tools, capable of communicating all sorts of things to others, whether we’re aware of it or not. Being aware of your background, and making some small, intentional changes can make our image more appealing, reassure viewers of our authenticity, and even hint at our characters.
This article will discuss various aspects of creating a good background and a cohesive scene for a camera feed. At the end of the article, I'll show you how I made changes to my own scene to improve it. Here’s a rundown of the structure of this article:
- What makes a good scene?
- How much background space?
- Busy or simple?
- Using colour
- Using lighting
- Using software
- Improving my scene
You can use these tips whether you’re doing nothing but business calls, getting started with streaming, or looking to create great video to share online.
What makes a good scene?
A good scene is one that helps the viewer to understand your message. It should be cohesive, and can add information, but it shouldn’t be distracting. The best scenes will immediately communicate the purpose of the image.
What a good scene looks like for you will depend on what you want to communicate. It may help to consider what is included in the frame much as a director would in laying out a film scene, with consideration to what the camera angle, lighting, framing, and other details say to the viewer.


In the image on the left, a still from Wes Anderson’s The Royal Tenenbaums, there is an entire story to be read in the chaos of new and faded tennis balls on the floor, the trophies on the wall, and even the casual posture of Richie Tenenbaum. You may of course choose to make your cues more subtle, as in Sommerset’s comparatively minimal scene on the right. Whether or not you’ve seen her videos before, the pink lights, fuzzy furniture and luxe gaming chair tell the viewer that this is a serious Twitch streamer who brings a personal, whimsical edge to her content.
How much background space?
Ideally, a good scene should provide a sense of distance between yourself and the back wall of your scene. It’s hard to give an exact distance, but too much space behind you can risk distraction (and noise issues caused by large spaces), while too little space can feel claustrophobic.
Generally, this question will be determined by the amount of space you have available to you, and it’s probably more likely that you’ll have too little space than too much space.
If you’re tight on space, you might prefer to keep your scene a little less busy, and you’ll definitely want to look at the lighting section to see how to create more of a distinction between yourself and your background.
If you feel you’re showing too much background in your scene (perhaps you live and work in a studio and aren’t keen on showing your coworkers your bed) you can make use of a couple of Camo features to reduce the amount of background that you’re sharing. Using Camo’s bokeh filter to slightly blur your background can prevent your background from being too distracting, and you can zoom and pan your video to crop out any aspects of your video that you don’t want to show.


Busy or simple?
Now you’ve got the outline of your scene’s perimeter sorted, the next question to answer is how much stuff you want to fill your scene with. Again, this may be somewhat determined by what you already have in your scene, and what you can remove, but when it comes to adding and removing the things we can control, consider what a busy versus simple scene can convey.
Busy Scenes
Busy scenes are scenes that have lots of things going on around the subject. The two self portraits at the beginning of this article are pre webcam examples of busy scenes.
Busy scenes are interesting to look at, and they provide lots of opportunities for communicating purpose, but they can distract from the person in the video.


Busy scenes are often used in order to establish some sort of knowledge and experience. When I worked in book production, a remote colleague of mine took webcam calls while sitting in front of a bookcase displaying all the books she’d brought to publication. It was a lot of books, and it was simply not possible to forget her expertise while on calls. In this way, busy scenes can help to establish authority on a particular subject or topic.
Here’s a shot of Aidan from Camo filming in front of his monitor, rather than behind.

He’s using Camo’s Portrait Mode, which lets the busy scene add context, without becoming too distracting. The scene shows all of his test cameras, along with filming equipment. Viewers should immediately be able to assume that Aidan’s work involves something to do with cameras and filming.
Simple scenes
Simple scenes, on the other hand, have very little in them other than the subject. These sorts of scenes are ideal for helping to keep focus on the speaker, on what it is they’re saying or doing.
While busy scenes can help to establish a sense of technical expertise, simple scenes are better for actually explaining and demonstrating technical information. Most good ‘how to’ or lecture style videos keep the scene simple, sometimes using a green screen to entirely block out a background, and adding overlays to emphasise what is being said.


Simple backgrounds are often the best option to use if you’re adding overlays, banners and presentation points to your video, and they are also the best option if your video is only going to take up a small section of the screen, as with gaming streams or zoom calls with many other people. In these cases, busy scenes can overwhelm the person in the shot.
At the risk of stating the obvious, you can make a scene look busier by adding more to your scene, and simpler by taking things away. But when we talk about how busy or simple a scene is, a large part of that is how much attention the subject is being given, compared to the rest of the scene. To make the scene focus more upon the subject, consider cropping the video more tightly around your face, or think about zooming out (or using other lenses on your phone) to make yourself smaller compared to the rest of your scene.


Simple scenes don’t have to be entirely empty or boring. You can make a scene appear more simple by keeping the colours of the items in the room cohesive. Likewise, you can add interest to a simple scene by including colour in the background, either with lights, or coloured screens.
Summary
Busy scenes:
- Help to establish the speaker within a context.
- Work well for videos that will take up a large portion of the screen.
- Can add authority and credibility.
- Can look overcrowded if not well organised.
- Can be made less distracting with the use of a Bokeh lens or filter.
Simple scenes:
- Keep the focus on the subject.
- Are helpful for explaining technical information.
- Are better when your video is likely to take up less space on a screen.
- Can be useful where there is more than one subject, or where overlays and banners are likely to be used.
- Can be made more interesting with soft lights and cohesive colours.
Using colour
Colour can be used both to create uniformity in a scene, and to create distinction.
Matching colours in the scene with the subject, as shown in the images below, creates harmony within the image.


Using contrasting colours between the subject and the rest of the scene can help the subject stand out from the scene, and can be more attention-grabbing, particularly when competing with other videos or image thumbnails.


There aren’t many drawbacks to using colour in a scene, though it may be helpful to consider the context in which you’ll be using your scene. Lots of RGB lights are eye-catching, but tend to signal certain contexts to viewers. I’m not really talking about colour psychology here, although that is interesting, but in a more specific set of societal expectations around colour. Thinking back to the scene for The Royal Tenenbaums and the Twitch streamer’s setup, if we switched the colours used in each scene the effect would be unexpected and jarring. People like things that are easy to categorise, and in creating our scene we’re essentially trying to provide viewers with a way to categorise us, and considered use of colour can help to guide that.
We’re past the point where using colour in a webcam background would be considered unprofessional, but if you’re tailoring your scene for a specific corporate use-case, it can be helpful to think about company colours and logos. Adding your company’s colours to your scene can make it easier for people to place you, especially if you’re doing lots of outbound calls.
If you’re interested in learning more about colour theory, Josef Albers Interaction of Colour is fun and enlightening, and can be read interactively on an iPad for about $10, depending on your region.
Using lighting
We wrote up a guide a little while ago on how to get started with lighting your scene. The focus there is on lighting yourself well, but lighting your background is just as essential for creating a great scene. Adding lighting to your scene adds depth, and helps viewers see detail. Even if you have a very simple scene, lighting it well will always make it look more professional. All of the images I’ve used in this article include background lighting in some form.

There are a couple of different ways to use lighting in the background to improve your scene. These mainly fall into two categories: visible lights and off-scene lights.
Visible lights
I’m using this term to refer to light sources you can see in a scene. Things like desk lamps and neon signs.
Visible lights can be quite utilitarian, like desk lights or wall lights that you already have in your room, or they can be purely decorative, like lava lamps or string lights.
You’ve possibly already got access to a number of visible light options, and it can be helpful to have a go at adding and moving visible lights around in your scene to see where they look best. Visible lights tend to look better at a distance from where your head is going to be in your scene, so that both can be seen clearly.
As with any light being placed behind you, you don’t want these lights to be too bright and too big, as they can make the foreground (you) darker in comparison. Small bright lights tend to work best in scenes to add interest.
Off-scene lights
Off-scene lights can be used to light up your scene, without being visible themselves.
YouTuber Paul Heimlund shows how he uses five groups of mostly off-scene lights to create a professional studio lighting setup. This video is helpful if you’re not sure where to place off-scene lights, or why you might need them.

You can add off-scene lights to brighten your scene by using the lights you already have in your room, though be aware that overhead lights can be unflattering. If lights aren’t dimmable, they can also add too much light to a scene, watering down the impact of visible lights in your scene.
You may not always need to add off-scene lights, depending on the amount of light in the room provided by lighting yourself, visible lights in your background, and the type of scene you’re trying to create.
Dark vs light scenes
Adding lights doesn’t mean lighting everything up as bright as can be. Creating darker scenes can be helpful for changing the feeling of a scene.
Darker scenes can feel more intimate and conversational than brighter scenes. Think about the contexts in which you might be in a darker environment, compared with lighter scenes:
Darker environments
- Restaurants
- Living rooms
- Spa treatment rooms
Lighter environments
- Hospitals
- Offices
- Classrooms
With this in mind, making your scene darker can be helpful if you want to create an atmosphere that is relaxed, friendly, personal and conversational, while brightly lit scenes can help create a more sterile and professional environment.


Using software
We’ve already mentioned a couple of ways to use Camo’s software to improve your scene, but let’s look more broadly about how software can help a scene.
Colour correction and image adjustment
You can use software to do things like increase saturation, exposure and contrast of live videos, or add hues to highlight certain colours within your scene. All of this is available in Camo Studio, but if you use a webcam you might find that your webcam provider offers software with similar adjustment, too.
If you’re using a DSLR, there’s limited software available, so your best option is to adjust the image directly from your camera, which will involve a fair amount of getting up and down to check the image.
For all-in-one colour adjustments, LUTs are an automatic way to apply a number of colour corrections at once. You can use them to simultaneously boost your skin tone and certain colours in your scene. This video walks you through how to make and use LUTs in OBS. There are also a number of premade LUTs available, but these tend to work less well than something that’s been created with your specific scene in mind.
Adding filters
We’ve talked a little about background blurring already. Again, this is available in Camo, but similar software is also available in Zoom and FaceTime.
It’s helpful if the software you’re using has a slider for filters, as this allows you to change the intensity for your scene, allowing you to make the filter look as realistic as possible.
You can also use software to create a virtual green screen, allowing you to replace your background entirely with a virtual one.
Way back when many of us were first coming to terms with bringing work into our homes, virtual backgrounds enjoyed a spate of extreme popularity, used as a sort of shield to protect private lives from colleagues and classmates.
Since then, attitudes towards virtual backgrounds have soured in some groups. People can find those who use virtual backgrounds less trustworthy. Using a generic Zoom template as a virtual background for all calls is contrary to the purpose of this article, which is to create a unique background that will help provide viewers with context on you, and on what you’re doing in your videos.
That’s not to say that virtual backgrounds or green screens should never be used. In some cases, a green screen is an ideal great option for a scene. Similar to simple scenes, a green screen is a good option if you’re presenting technical information, or teaching, as it allows you to both eliminate all distractions, and to add emphasis in the form of screen overlays (more on this below), and can also be a good option if you’re imposing a small video of yourself on top of something else, as can often be seen with gaming streamers, for example.

Overlays
You can also use software to add overlays to your scene. These can be in the form of text and images that remain present in your scene throughout, which can be helpful to remind people of your name and role, or animated overlays which might pop up to emphasise a point.
You can add stationary overlays in Camo, while animated overlays can be created in OBS, Twitch Studio and Streamlabs.
It’s generally best to start small with any software adjustments, and err on the side of adding less, and these features, while effective when used sparingly, can become distracting when used in abundance.
Improving my scene


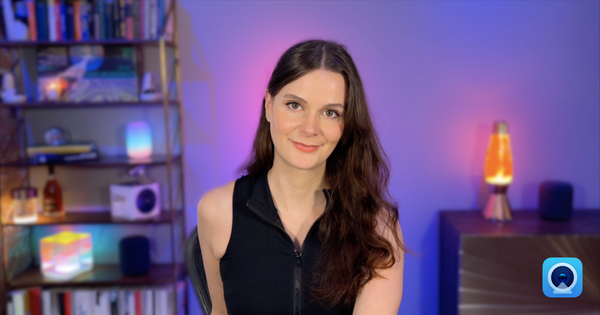
After working through the various points in this article, I changed my scene to that shown above.
Here, point by point, is what I changed in my scene and why.
- I started by changing my position in the room, so that I could avoid having the window and brick in shot. I also removed the picture from the wall, because it didn’t look great in my scene and added unhelpful reflections. These changes gave me a blank canvas behind me to work with.
- I painted the wall behind me grey. This was the most involved step, but it made by far the biggest difference to my scene. I chose the most neutral grey I could find, in the darkest shade I felt comfortable cohabiting with. The optimum shade for filming would be a perfectly neutral middle grey, but the paint I used is a little lighter, with slightly less red than green and blue. With a darker background, it’s easier to create distinction between myself and the background. Grey walls also show colour from lights much better than white walls, allowing me to create a more vibrant scene
- I kept the space around my head free from obstruction. This helps keep the focus on me in the scene, and allows virtual portrait mode to work better.
- Because I’d removed quite a lot from the scene at this point, I added in a bookcase. I filled this with visible lights (more on this below), books, and some objects from around my home, with the intention of creating a scene that showed something more about me.
- I added a bunch of lights! There are three visible lights in this scene, as well as three lights on the wall (two Philips Hue spotlights in the ceiling angled towards the wall, and a Philips Hue gradient stick behind me. Sitting in front of the light stick obscures the light, creating a highlight around my head

I hope you’ve found this article helpful. If you’ve made it this far, I’d love to hear from you.