Filters & the Filter Gallery
Filters are a great way to calibrate, customise or boost the look of your video, and Camo comes with eighteen bespoke filter presets. These include film and analog looks, cinematic gradings like Bleach bypass and Blockbuster, and practical tools like a chroma keying optimiser (Greenscreen booster) and exposure monitor (False colour). Camo also enables you to import LUT, Cube and 3DL files that you have downloaded or created, and organise or group them in the Filter Gallery.
Filter controls in Camo Studio
Filter controls are located in the right sidebar of Camo Studio. In the pull-down menu, you can open the Gallery to see how each filter will look when applied to your video, choose from a set of recently used filters, or import a preset file into your filter library.
Once a filter is chosen, its strength can be controlled with the slider located under the menu.
The Filter Gallery

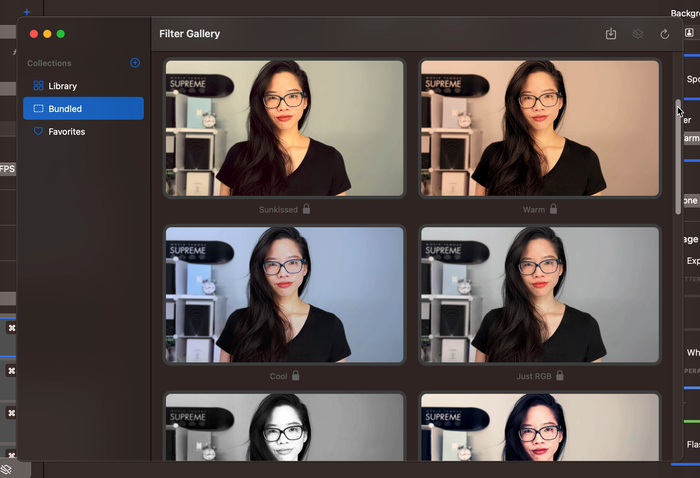
Camo Studio’s Filter Gallery allows you to keep your filters organised, and add new ones. Once you’ve opened the Filter Gallery, clicking on any filter in the menu or gallery will apply it to your video, and clicking on the heart in any filter window will add it to the favourites section of your library. To re-order the filters within the gallery, just drag and drop each one to its new location.
The sidebar has three collections by default: Library, featuring all filters in your collection; Bundled, featuring the filters included in Camo Studio as standard; and Favourites, featuring the filters that you have favourited
Use the + button in the sidebar to add a new collection to your gallery, and rename or delete your collections by right-clicking on them.
You can move a filter between collections by right-clicking on it in the gallery and selecting "Add to Collection" – or remove it from a collection by selecting "Remove from Collection."
In the top right corner of the gallery, you'll see a button to import LUTs, disable the currently in-use overlay and to refresh the preview image used throughout the gallery.
How to preview filters before use
When it’s opened, the Filter Gallery takes a snapshot of Camo’s video feed to use as a preview image for all of the filters it contains. You can refresh this image by clicking the refresh arrow in the top-right corner of the gallery window.
To see a live version of the filter in action, select it from the Filter Gallery or the dropdown menu in Camo Studio’s interface to enable it.
How to import filters for use in Camo

Camo supports the import and use of any preset colour or calibration files in LUT, Cube or 3DL formats. This means that you can download or create presets outside Camo, and then add them to your filter library for use with whatever device you choose.
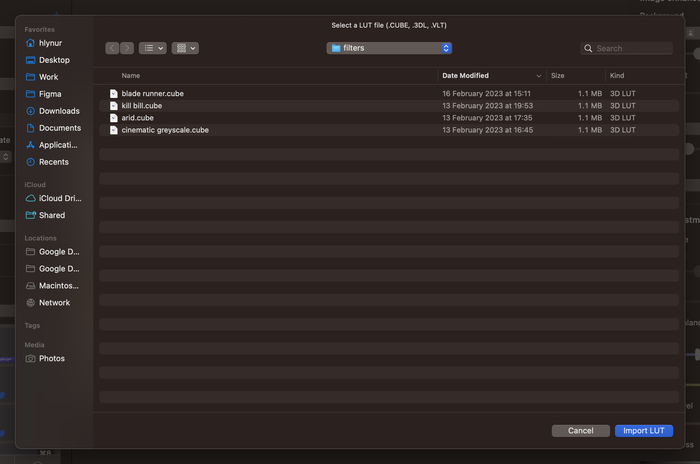
To import a filter directly from the Camo Studio interface, just click on the Filters dropdown menu, and select ‘Import LUT.’ If you are already in the Filter Gallery, you’ll click on the import button in the top-right corner of the window.
In the new window, just navigate to where the .CUBE, .3DL or .VLT files are located on your computer, and click on ‘Import LUT’ when you’ve located it. Your new filter will automatically appear first in the Filter Gallery window, and you can apply it immediately.
Alternatively, you can select, drag and drop one or more supported files directly into the Filter Gallery.