The ultimate webcam: DSLR, mirrorless or iPhone?
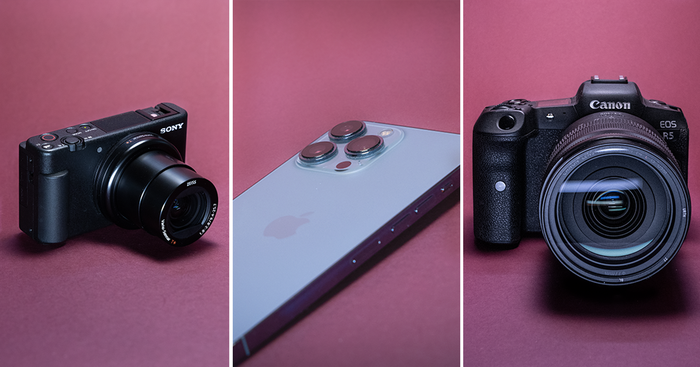
Sometimes your video calls just need to look great: you’re giving an important presentation, raising capital, doing live training, or perhaps you just hold yourself to a higher standard, even when wearing pyjama bottoms off-camera.
There are several ways to improve the quality of your calls, from better camera placement to enhancing the lighting in your room, but after nailing the basics, at some point you’ll want to go further. We’ve already determined that standalone webcams aren’t good enough, so that leaves two options: use a DSLR or mirrorless camera, or take advantage of the excellent hardware and software in your iPhone.
Just had my first @zoom_us call using CAMO by @reincubate. That's a super extra sweet setup and the image quality is so much beyond that of my built-in MBP webcam. And world easier than setting up my DSLR. Don't think I'll try and find a different setup for a while.
— Nicolas Steenhout (@vavroom) February 5, 2021
Both approaches will give you better image quality, but tradeoffs abound. For instance, connecting a typical camera isn’t as simple as plugging a USB cable into your computer; not every camera model is supported; batteries are almost guaranteed to run out at the wrong moment; and if you’re using your cell phone as your webcam, you can’t respond to messages or distract yourself during boring meetings.
That may sound daunting, but when your video calls need to look great, the quality improvements are worth the up-front effort. In this article, I’m going to deconstruct what you need to use a smartphone or a digital camera for streaming video calls, by comparing four devices.
I'll look at how each option shapes up in terms in each of the following categories:
I’ll score each device on a scale of 1 to 5 in each category, so you can come away with a comprehensive picture of each option before you start making investments in time and hardware.
Devices tested
You can go buy all new gear, but you may already own a camera that will work as a webcam, such as an old iPhone or a DSLR that comes down from its shelf only during vacations and holidays. For this article, I’m testing the following:
- Fujifilm X-T3 mirrorless camera with a Fujinon 27mm f/2.8 lens
- Canon 7D Mark II DSLR with a Canon 35mm f/1.4 lens
- iPhone SE (2020 model)
- iPhone 12 Pro
The iPhones are running Camo, the software that enables them to function as webcams. The Canon and Fujifilm cameras were tested using both computer-based webcam software from their respective manufacturers and USB capture card hardware that converts the video signal from the cameras to the computer. (From here on, I’m going to combine DSLR and mirrorless cameras as simply “digital cameras” to avoid repetition, even though you and I know that all the cameras are digital.) On the computing side, all of the cameras are connected to a 16-inch MacBook Pro (Late 2019 model).
In most situations, I’ve set both digital cameras to roughly the same settings for consistency: video mode, f/2.8 aperture, ISO 800, shutter speed of 1/60 (in video, a general rule is to set the shutter speed to double the frame rate), and positioned to have similar framing.
Cost
Let's start by looking at how much each option will set you back. Let me stress that these are going to be very rough figures, because there’s no one-size-fits-all approach, and the prices of plenty of components, like tripods, range from ultra-cheap to I-can’t-believe-someone-would-pay-that.
If you already own an iPhone, using Camo with that will be the cheapest option. If you use the free version of Camo, and have some way to prop your phone up for calls, you won't have to pay anything to use your iPhone as a webcam. As I've looked at Pro features in this article, such as Portrait Mode, I'm including the price of Camo Pro, alongside an iPhone mount and a good lighting to USB cable.
| using an existing iPhone | |
|---|---|
| Tripod/mount | $25.00 |
| Lightning cable | $20.00 |
| Camo | $39.99/year |
| Total | $74.99 |
Apple’s current least-expensive model is the iPhone SE (2020) at $399 if purchased new. The most expensive is the iPhone 12 Pro Max at $1,099. I'll use the average of those here. For use as a webcam, it’s worth looking for older, used models on eBay or wherever you prefer to shop for such things. I bought an iPhone 6 last year for $80 to test, though to be honest, for everyday use I’d consider a model with a better camera, such as the iPhone 8, which currently runs around $175.
| buying an iPhone | used | new |
|---|---|---|
| iPhone | $175.00 | $749.00 |
| Tripod/mount | $25.00 | $25.00 |
| Lightning cable | $20.00 | $20.00 |
| Camo | $39.99/year | $39.99/year |
| Total | $259.99 | $833.99 |
Setting up a DSLR or mirrorless camera is going to be more expensive. The cameras themselves are more expensive, and the setup involves more equipment, and therefore more money. Digital camera bodies vary widely, so to narrow the field, I'm including the price of the sort of camera I'm testing here. There are a number of cheaper DSLR options on the market, but, as the Reincubate team receive a large number of messages from customers who have 'upgraded' from this option to an iPhone, I won't be discussing them here.
This is @reincubate Camo (virtual webcam software) *wired* to an iPhone 12. Next to it is a real Sony A6000 to an Elgato 4k. Very reasonable solution if you want a WAY better webcam than what you have today. pic.twitter.com/BPWkEuzc7v
— Scott Hanselman (@shanselman) January 28, 2021
The Fujifilm I'm using retails at $1,900 (with a kit lens) and the Canon retails at $1,700 (body only), so I'll take the average of these costs. You can sometimes find used versions at as much as half the price, though they continue to be in high demand. As you can see, if you already have a compatible digital camera on a shelf that doesn’t get used much, you'll be able to cut down costs significantly, though you'll likely still need to purchase some other bits of kit.
| using an existing camera | |
|---|---|
| Camera lens | $350.00 |
| Capture card | $120.00 |
| HDMI cable | $8.00 |
| Tripod | $50.00 |
| Dummy battery | $30.00 |
| Total | $558.00 |
Since the goal is quality, I’d say a fast lens that has a maximum aperture of f/2.8 is the starting point, with f/1.8 being even better for that soft background look. Look for a 16mm, 28mm, or 35mm model, depending on how wide you want the field of view to be; “nifty-fifty” 50mm f/1.8 lenses are plentiful and relatively inexpensive, but that focal length would require placing the camera fairly far away from your computer. So, let’s say $350 for a decent lens.
| buying a camera | new | used |
|---|---|---|
| Camera body | $1,800.00 | $900 |
| Camera lens | $350.00 | $350.00 |
| Capture card | $120.00 | $120.00 |
| HDMI cable | $8.00 | $8.00 |
| Tripod | $50.00 | $50.00 |
| Dummy battery | $30.00 | $30.00 |
| Total | $2,358.00 | $1,458.00 |
We’re going to take the capture card route, since that gave the best results in my head-to-head testing below, which means getting the Cam Link 4K ($120) and an HDMI cable ($8).
For the camera tripod, you want something sturdy enough to hold a camera and lens. Depending on your space, you may want one that stands on the floor behind your desk or table — which will occupy more space — or a tabletop model that stands just behind your computer screen. You can get decent tripods in the $50 to $75 range, which include a ball head for adjusting the camera. I do not recommend camera tripods with flexible, adjustable leg segments, unless you want to spend all of your energy trying to level the camera and swearing.
| Scores: Cost | |
|---|---|
| Fujifilm | 2 |
| Canon | 2 |
| iPhone SE | 4 |
| iPhone 12 Pro | 3 |
For power, you can buy dummy batteries that plug into AC power for $25 to $30 online, but definitely research reviews and look for reputable brands, since you don’t want a cheap power source frying your camera. (More reliable options, such as from TetherTools, can run $150.) That brings our starting-from-scratch total to $2,358, or $1,458 if you can find a used option. Assuming you already own a camera, the price drops to $558.
Ease of setup and use
Next, let's look at how easy each option is to use for video calls. The significant advantage that standalone webcams have over an iPhone or a digital camera is that they’re plug-and-play. Connect one to your computer’s USB port, mount the webcam to the top of your monitor (most have a clip design that can be attached to nearly anything), and you’re good to go.
For an iPhone running Camo, you’ll need a Lightning cable to connect it to the computer, and a tripod or other way to mount the phone so its camera is at the correct height; a good place to start is How to mount an iPhone webcam: which mount is best.
If you plan to use your everyday iPhone for video calls, your main consideration needs to be how easy or difficult it is to get the phone into place. Suppose someone important asks to jump on a quick video chat. You’d need to launch Camo, plug the iPhone into the computer, and attach it to the mount. And if you get a phone call during the video meeting, you probably won’t be able to answer it. This is the argument for repurposing an old or inexpensive iPhone for use as a dedicated webcam. If the phone is already in place and connected, you just need to make sure it’s powered on and running Camo.
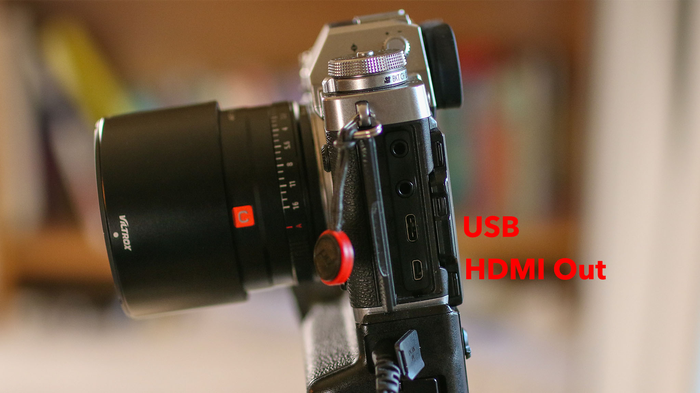
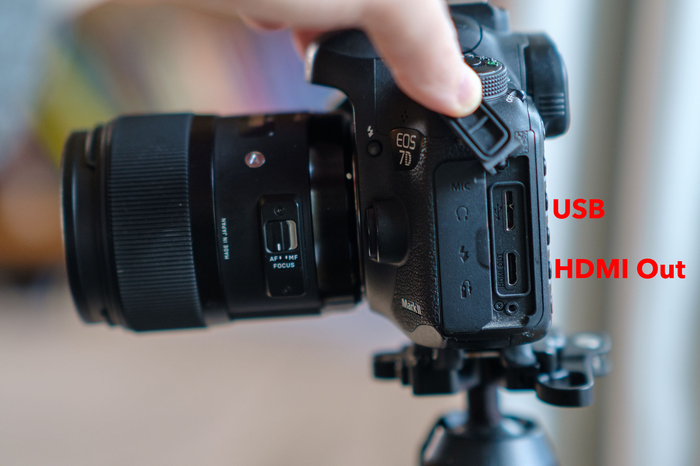
Similar considerations apply to setting up a digital camera as your webcam. You’ll need a tripod that’s sturdy enough to hold the camera and lens, plus the cabling to connect the camera to the computer via USB or via HDMI if you’re using a capture card. In the latter case, you may also need to purchase an HDMI cable or adapter with the correct connector type: regular size (Type A), mini size (Type C), or micro-size (Type D). On my example cameras, the Canon 7D Mark II includes a mini size port, and the Fujifilm X-T3 has a micro-size port.
If the camera is one you grab frequently to shoot photos and video, you’ll incur the hassle of setting it up as a webcam each time it returns to your workspace. If it’s in a place where the tripod and cabling can live permanently, switching gears isn’t a big deal. If you’re setting up in another room for video calls, you’ll have to factor in the time it takes to set up (including any lighting) and tear down all the pieces. And don’t forget the camera settings, which trips me up too often: I take my camera out to photograph something, press the shutter button, and realize I forgot to exit the video mode and reset the ISO and shutter speed settings.
The most important, and potentially most annoying, component required for streaming using digital cameras is power. With the iPhone, as long as it’s plugged into the computer, it’s receiving power. Digital cameras, meant to be portable, rely on batteries, which deplete faster when you’re shooting video. The last thing you want in the middle of a call is to swap batteries because your video died.
the battery problems of @Sony's ZV-1 are starting to get in the way. battery capacity is tiny, and you can "power" through USB, but the battery still drains rather quickly. for any longer streaming tasks, this doesn't work. what's your camera of choice? https://t.co/z7BjNHErvx
— Erik Wilde (@dret) June 8, 2021
To keep power flowing, a few options are available. Some cameras can charge the battery via the USB port; if you’re using a capture card and sending via over HDMI, you could plug in a USB cable connected to a USB power adapter or power bank.
On my X-T3, I attach a battery grip accessory that holds two extra batteries and makes it easier to shoot lots of portrait-orientation photos. The grip also comes with an AC adapter and power plug so I don’t need to use the batteries at all.
A less expensive option is to purchase a dummy battery that plugs into AC power. It slides into the camera’s battery port and trails a power cord and adapter you can plug into the wall. Make a point of researching your camera model to see if you’d need to remove or adapt the battery door; many cameras won’t operate if the door isn’t closed securely.
The last consideration is heat. As you record video or stream to a computer, the internal components build up heat, such as from the battery expending energy and data being written to the memory card. To protect against damage, some cameras will automatically shut down when a specific heat threshold has been reached. Some camera models that shoot 8K or 4K video, like the Canon R5, are notorious for heat buildup, lasting only 20 or 25 minutes before turning off, and then requiring a lengthy cool-down period before they’ll turn back on. Although my Fujifilm X-T3 has never overheated, the body is noticeably warm if I’ve had it on for several hours acting as a webcam; I accidentally left it on overnight and, fortunately, it was only warm, not toasted.
Any suggestions for a reliable streaming camera? I had the Sony A6400 but it would over heat (even with the temp option off) and shut down eventually even with a dummy battery after 2 hours.
— ilan Bluestone (@iBluestone) April 17, 2021
I lost my canon doing that overheat and killed the motherboard
— Rui Marinho (@ruiespinho) February 20, 2021
There are a few things you can do to mitigate heat. Setting the camera to 1080p/FHD requires less processing and therefore less heat. Turn off the camera’s LCD (since you’re able to view the output on your computer screen). If the LCD is adjustable, move or angle it away from the camera body to help dissipate heat. Using a dummy battery will also help, because the internal battery isn’t inside the body expending energy.
Older iPhone models, such as the iPhone 5S, are also susceptible to overheating, though newer models are not. This can be addressed by using the iPhone 5S in 720p.
Whether it’s heat, power, or setup, the digital cameras and the iPhones require more work compared to standalone webcams. In this category, I’m scoring the iPhones as 3s, to account for a typical situation where someone would use their everyday phone with Camo; assume that climbs to 4s if you’ve repurposed an old model that can remain in place as the webcam.
| Scores: Ease of Setup and Use | |
|---|---|
| Fujifilm | 2 |
| Canon | 2 |
| iPhone SE | 3 |
| iPhone 12 Pro | 3 |
The digital cameras get scored as 2s here, simply because there are more pieces and settings to keep track of. Again, that score goes up slightly if you can press an old camera into service that won’t be used for anything else.
Connection options
Connecting an iPhone to the computer is simple: plug it in via USB and make sure the Camo apps are installed on both the iPhone and the computer.
For DSLR and mirrorless cameras, though, you have two choices, one software and one hardware: install a manufacturer’s webcam utility software on the computer and connect the camera via USB cable, or purchase a separate capture device that connects to the computer via USB cable and to the camera via HDMI cable.
If you already own a camera that’s supported, the software-only option is direct and free. Some of the utilities provide just a pipeline for video from the camera to the computer, while others offer a way to change camera settings such as exposure compensation without getting up and adjusting the camera’s controls.
The free utilities can be found at the following links; make sure you check that your camera is on the appropriate compatibility list:
- Fujifilm X Webcam
- Canon EOS Webcam Utility
- Nikon Webcam Utility
- Sony Imaging Edge
- Panasonic LUMIX Webcam Software
- Olympus OM-D Webcam
The experience of using the utilities is mixed. Some of them are still in beta, so expect rough edges. I tested the Canon EOS Webcam Utility and the Fujifilm X Webcam Utility, both of which are shipping versions, but the quality varied widely. The Fujifilm X Webcam 2.1 software has surprisingly low resolution and a slow, jerky frame rate, whereas the Canon EOS Webcam Utility is smooth and decent. Although I didn’t test it, Sony’s Imaging Edge utility states a maximum resolution of 1,024 by 576 pixels.
You may run into other complications. Some webcam software implementations work only with browser-based versions of video calling services, not native apps. For example, the Slack app on macOS doesn’t recognize the Canon EOS Webcam Utility, but if you connect via Slack’s web interface using Google Chrome, the camera does appear.
Being able to just plug in your digital camera and run an app in the background is appealing, and because the utilities are free, by all means give them a try. However, you’re likely to get much better results using a USB capture card device. (The ones I’m looking at are all stand-alone units that plug into USB; the “capture card” name comes from internal boards that can be added to tower PCs.)
A capture card connects to a camera’s HDMI port and converts the video signal so it is UVC (USB Video Class) compatible, which is how apps like Zoom see it as a video source. These devices can output higher resolution images, up to 4K if the camera and device supports it. They also offer less lag between your movements and what appears onscreen.
The most popular of these is the Elgato Cam Link 4K, $120. When that model wasn’t available last year, I ordered a device labeled just “USB3.0 Video Capture HDMI 4K,” which is made by several Chinese manufacturers you may never have heard of; mine didn’t have a company listed. This one from Goodan looks like the exact same model I own, and costs about $50 USD. I also tested an inexpensive $20 USD Y&H HDMI Video Capture Card.
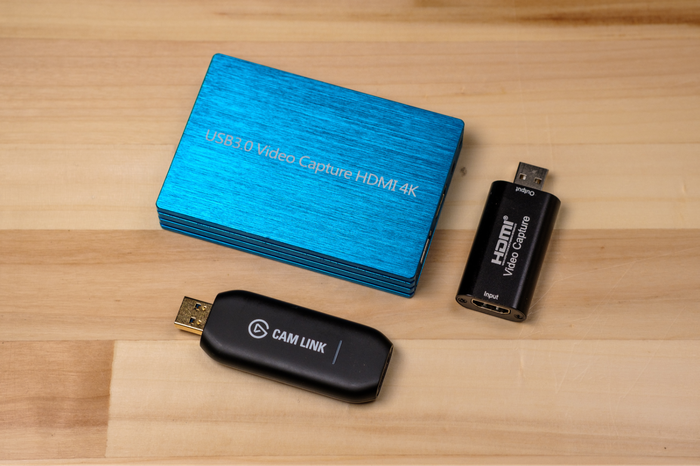
Keeping in mind that your video resolution is going to be reduced in transit (see the video quality section for more on this), why consider a more expensive capture card? Primarily you’d want 4K capability if you were recording straight from the camera, not just streaming a video call. However, I found that using the Cam Link 4K produced better video than the other two, perhaps due to better internal components. The Cam Link can send a 4K signal to the computer over its USB 3.0 connection; although the no-name USB 3.0 box connects via USB 3.0, it outputs only 1080p; and the Y&H card accepts and outputs only 1080p over a USB 2.0 connection.
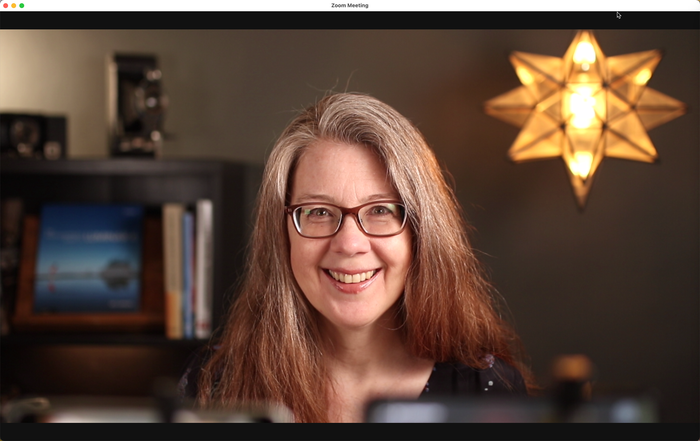
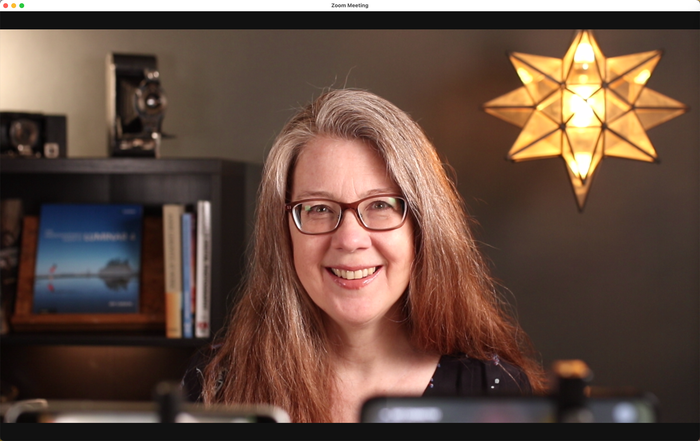
The differences between the devices are pretty clear, not only in resolution, but also in color quality. The Cam Link 4K looks better, both when the X-T3 is set at 4K recording resolution and FHD/1080p. I didn’t see much difference between the 4K and FHD settings on any of the cards, which could be attributable to the X-T3’s video handling; they didn’t exhibit the artifacts we saw earlier with my friend’s Sony mirrorless camera, which was also connected via a Cam Link 4K.
One thing to be wary of with capture cards is whether the camera can output clean HDMI, or video that shows only what the sensor sees. Another thing is that, with a capture card, you won't be able to remotely control the camera settings from your desk as you can with Camo or a camera webcam utility. The Canon 7D Mark II initially shows everything you’d see on the back LCD panel; pressing the camera’s physical Info button twice removed those. But it’s worth checking online to see if your camera can output clean HDMI. On some early Canon models, the only way to get clean HDMI is to install special software from the Magic Lantern project that runs alongside the camera’s firmware.
To be fair, even the Y&H capture device gives you the benefits of using a better camera and lens, wide apertures for shallow depth of field, and the no-hassle, no-software approach of simply plugging the camera and device into the computer. Although I find the image to be over-exposed and too warm compared to the Cam Link version, those are qualities easily adjusted on the camera by reducing the ISO to 400 and changing the White Balance setting. For many video calls, this quality would be OK if you’re on a budget.
| Scores: Software | |
|---|---|
| Fujifilm | 2 |
| Canon | 4 |
| iPhone SE | 5 |
| iPhone 12 Pro | 5 |
To score this category, I’m breaking Connections into two parts: Software and Capture Card. The Fujifilm X Webcam software fell down hard (2), while Canon’s EOS Webcam Utility fared well (4), though neither are as good as the iPhones running Camo (5). Yes, I know that sounds like I’m being a biased judge here, but since we’re looking at the quality of the output, the Camo software not only piggy-backs on the iPhone’s camera technology, but also offers many controls for adjusting parameters such as exposure, white balance, and saturation.
| Scores: Capture Card | |
|---|---|
| Fujifilm | 4 |
| Canon | 4 |
| iPhone SE | 5 |
| iPhone 12 Pro | 5 |
For the Capture Card part, each digital camera receives 4 points, since the discrepancies I saw were between the cards, not necessarily between the cameras themselves. Because you can just plug in the iPhone, you don't need a capture card, so they both get 5 points.
Image quality
I’m sure you’ve heard someone say, “Nice pictures! You must have a great camera.” A common misconception in photography is that if you just buy a better camera, your photos will automatically improve. Although a good photo can, in fact, come from any camera, for our discussion of webcams, it turns out that having a better camera can lead to a higher-quality look.
In the case of a DSLR or mirrorless camera, it has a physically larger image sensor, the component that records the light coming through the lens. The Fujifilm X-T3 uses an APS-C sensor measuring 23.5mm by 15.6mm, with 26.1 megapixels of resolution. The Canon 7D Mk II’s sensor, also technically APS-C, measures 22.4mm by 15.0mm, with 20.2 megapixels of resolution. High-end digital cameras use full-frame sensors measuring 36mm by 24mm. (And if you wanted to go crazy, you could look at the RED Monstro 8K sensor measuring 40.96 mm by 21.60 mm, which gives you 35.4 megapixels of resolution and greater light-gathering ability.)
By comparison, sensors in cell phones and standalone webcams are deliberately small to keep the size of the device compact. The iPhone camera sensors measure roughly 7.6mm by 5.7mm (the wide camera in the iPhone 12 Pro Max is 47 percent larger, according to Apple). Although a sensor may include enough pixels to capture 4K or 1080p video, each pixel is minuscule, and not able to absorb much light, particularly in reduced-light situations.
Remember that cameras crave light, so the more light you throw at a scene, the better the overall quality should be. That doesn’t mean overexposing the room and burning out your retinas, but rather making sure enough light is on you so the camera isn’t trying to artificially make up for it in software.
Another digital camera advantage is the ability to choose and swap interchangeable lenses on some models. That gives you more control over the field of view, represented as a millimeter (mm) measurement. For example, the 18-55mm telephoto lens that is often bundled as a “kit lens” for many cameras can be zoomed in, so only the corner of your living room workspace is visible to other people on your calls (at the 55mm range), or opened wider if you need to move around or use visual aids in your talk (at the 18mm setting).
Good lenses with larger maximum apertures can also expose more light to the sensor. A typical maximum aperture for that 18-55mm lens is f/3.5, which isn’t bad. But a 35mm f/1.4 lens allows more light, because the shutter opens wider when the aperture is set to f/1.4; lower values are better when talking about aperture. (Large-aperture lenses are referred to as “fast” lenses, because photographers would have to use fast shutter speeds to avoid overexposing the image.)
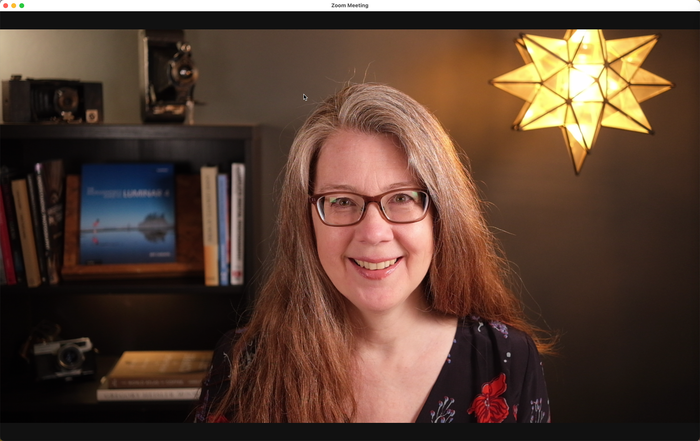
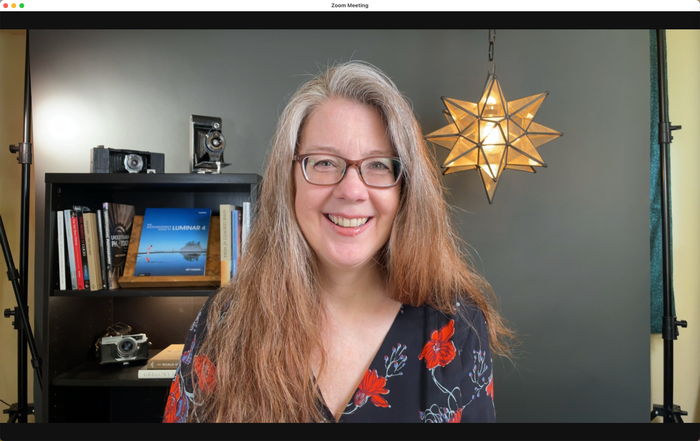
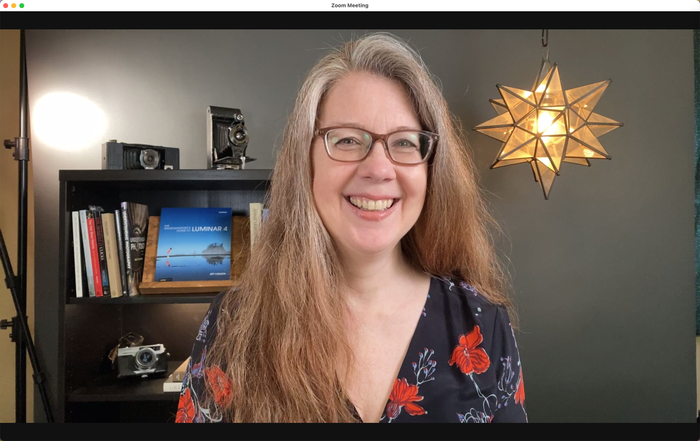
However, the most visible advantage of many digital camera lenses is how they can make a background appear soft and out of focus, an effect that many apps like Zoom artificially replicate with their background blur settings. This control over the depth of field determines how much of the scene is in focus. A lens set to a wide aperture, such as f/1.4 or f/2.8, exhibits a shallow depth of field, putting a narrow plane of the scene in focus. That can keep your face in focus and render the objects behind you slightly blurry.
Not only does a shallow depth of field convey a more professional appearance, it also keeps viewers’ attention on you, and not on the titles on the bookshelf behind you. If you do want to show off your background, you can set a smaller aperture such as f/5.6, which increases the depth of field and puts more area in focus. This option of choosing aperture settings gives you control over what’s in focus, with one tradeoff: the smaller the aperture, the less light reaches the sensor, so you’ll need to add more light in your environment.
Now, let’s turn to the iPhone models. Looking just at specifications, you’d think iPhone (and most other cell phone cameras) would be the opposite of digital cameras. Due to their overall size, the camera sensor inside the iPhone is small, and the lenses are fixed. On models such as the iPhone 12 Pro, you can shoot in three standard fields of view — wide, ultra-wide, and telephoto — because there are three separate cameras, each with its own sensor, working together.
The cameras also have fixed apertures that are quite fast (between f/1.6 and f/2.2 for the rear cameras on the iPhone 12 Pro), but with no actual physical shutter, you don’t have the same control over depth of field as with a digital camera. In fact, the small components are designed to get as much of a scene in focus as possible, making it nearly impossible to create a shallow depth of field effect optically, especially in a typical workplace setting.
So why are we even considering them? The cameras, for their sizes, are still quite good, but it’s not just the lenses and sensors at play in the iPhone. Apple’s extensive research and development over the years have merged software with dedicated image processing chips to compensate for the optical limitations.
On most digital cameras, you press the shutter button, the shutter opens, light is exposed on the image sensor, and the data is recorded to a memory card. On the iPhone, the image processor is automatically analyzing the scene as you’re lining up the shot, and when you tap the shutter button, a series of images of different exposures are captured, processed, and blended to create a high-quality final photo. For video and webcam use, the built-in image processing system is doing the same thing in real-time.
Although you don’t get the optical advantages of larger sensors and lenses, the iPhone’s computational processing delivers an image that’s considerably better than standalone webcams.
And what about those soft blurry backgrounds? Software does all the work there, too. Camo’s Portrait mode (currently in beta), working with the fast processors in the iPhone, determines the edges of foreground objects and blurs the background in a way that’s much more realistic than Zoom’s heavy-handed Blur background effect.
So how do these cameras score on the image quality front? One of the main considerations for these scores is the flexibility you have in shaping the image to your liking. In addition to depth of field and field of view, the digital cameras include controls for adjusting exposure via ISO, aperture, and shutter speed, as well as specifying white balance and, in some models, color profiles and presets. The iPhones use Apple’s algorithms for exposure and color, but those elements can also be fine-tuned in the Camo Studio app.
| Scores: Image Quality | |
|---|---|
| Fujifilm | 5 |
| Canon | 5 |
| iPhone SE | 4 |
| iPhone 12 Pro | 4.5 |
The two digital cameras are capable of producing the best image compared to the iPhones and other webcams, so they get top scores of 5 each. The iPhones, though not as sharp as the digital cameras, still give you a much better image than standalone webcams and built-in laptop cameras, so I’m grading the iPhone SE a score of 4 and the iPhone 12 Pro a score of 4.5..
Video quality
Composing a good image is important, but the “video” part of “video calls” brings up a couple of considerations.
When we talk about cameras of all types, one of the first things that jumps out is resolution, or the total number of pixels that make up the image. The video mode on your digital camera or iPhone may capture “4K” or “Ultra HD” (Ultra High Definition) resolution measuring approximately 4,000 pixels across (actually 3,840 by 2,160 pixels in most cases). More common is “1080p,” “Full HD,” or “FHD” (Full High Definition), which has a resolution of 1,920 by 1,080 pixels. Cameras that shoot at “720p” or “HD” (High Definition) record at 1280 by 720 pixels.
(Note that video resolution and image resolution are two different things. For example, even though the Sony a7R IV shoots massive 60.1 megapixel still images at 9,504 by 6,336 pixels, it still outputs 4K video at 3,840 by 2,160 pixels.)
Generally speaking, higher resolution leads to higher-quality video, because there are more pixels available to render more details. Great! Bring on more pixels!
However, we need to maintain some perspective, because what you see and what your viewers see appear quite different. Even if you’re looking at a crisp, 4K version of yourself, Zoom isn’t sending 4K resolution from your computer to the company’s servers en route to your call participants. When the pandemic spread last year and suddenly millions of people were working and learning from home, Zoom throttled connections to 720p to maintain performance; sometimes that quality downshifts to 360p or lower during peak usage times. That results in soft or blocky video, because the pixels are being enlarged to fit the screen. (You can open Zoom’s preferences and view the Statistics panel to reveal the current resolution during a call.)
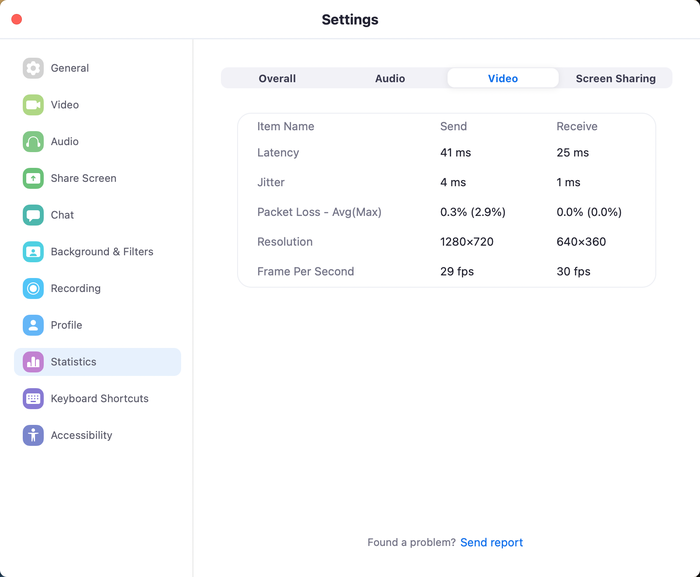
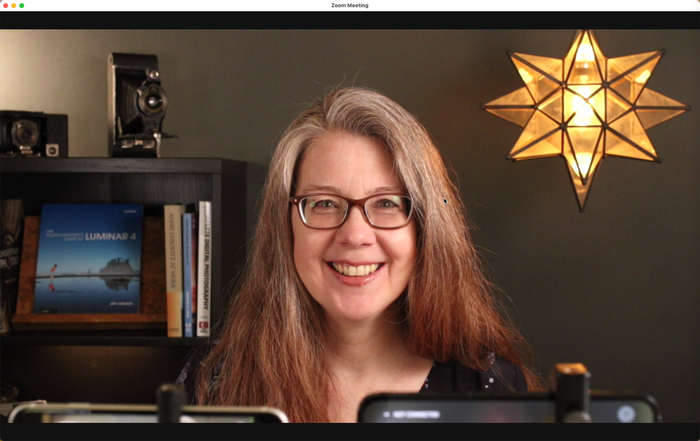
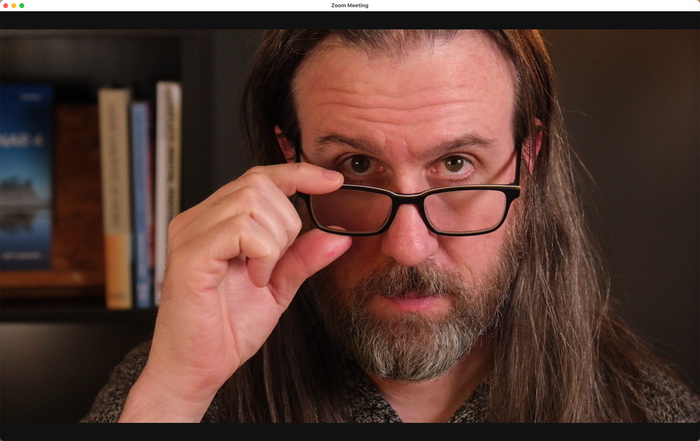
So, when using the Fujifilm X-T3 set to its 4K video resolution, the preview in Zoom looks pretty crisp. But when I join the call using an iPad Pro on my desk, my image from the X-T3 isn’t as sharp, even though the iPad Pro and the MacBook Pro are on the same internal network. That’s because the video is sent from the Zoom app on my Mac to Zoom’s servers, and then returned to the Zoom app on my iPad Pro, with Zoom reducing the resolution in-between those steps.
In fact, if your digital camera supports 4K video capture, you may want to switch it to 1080p/FHD to reduce the effects of shifting the resolution. In a test with a friend of mine who lives in Portland, Oregon, his incoming video exhibited an excess of blocky aliasing and moire patterns in areas such as his hair and his glasses. When he switched his camera (a Sony a7R III) from 4K resolution to 1080p, those artifacts went away. On the iPhone, Camo’s maximum resolution is 1080p for these reasons.
The next video consideration is focus. The iPhones handle autofocus well, in part due to the technology built into them, and partly due to the small sizes of the sensors and lenses involved, which naturally have broader depth of field.
On digital cameras, autofocus depends a lot on the specific camera and lens. When you’re using a fast lens set to a wide aperture, the shallow depth of field means you could move in and out of focus as you lean forward or back, or the camera could shift focus to your hands, especially if you’re an expressive speaker.
Modern camera models are pretty good with autofocus, and some excel at identifying faces and focusing on eyes. Check your camera model’s menus to activate its facial identification settings, if present, or to enable active scanning in a sports mode, for example. Even without those specific features, for webcam use, where you’ll likely be in the middle of the frame most of the time, focus should be fairly easy to lock.
What can be tricky is how a lens behaves when it focuses, which varies depending on the lens model. Some lenses focus more quickly than others, and nearly all of them exhibit some “breathing,” where the edges of the frame expand and contract because the glass elements in the lens are shifting as items go in and out of focus.
There isn’t a lot you can do about it aside from buying lenses that show minimal breathing effects (good reviews should mention it, or look it up in customers’ online feedback), and to be honest, it may not be something you notice often. It’s more of a problem if you have a slow-focusing lens or a very shallow depth of field, leading to distracting pops or jumps as the camera frequently adjusts focus.
The alternative is to set the camera to manual focus and use an aperture narrow enough that you’ll remain in focus even as you move around.
| Scores: Video Quality | |
|---|---|
| Fujifilm | 4 |
| Canon | 4 |
| iPhone SE | 4 |
| iPhone 12 Pro | 4 |
When contemplating scores for video quality, I’m inclined to award 4s all around. Many digital cameras and recent iPhones can capture 4K video, but there isn’t a great benefit, given how the video calling services reduce the resolution anyway. In terms of autofocus, it’s highly dependent on the camera and lens combination for digital cameras, while autofocus on the iPhone just works.
Conclusions
If we’re looking solely at image and video quality, the digital cameras connected via a good capture card would be the clear winner in our tests. However, it’s impossible to ignore the additional complexity that the setup requires.
For that reason, when we tabulate the scores, the iPhone solution comes out ahead due to having fewer pieces in play and still delivering image quality that surpasses standalone webcams. If you’re using your everyday iPhone as the video calling camera, some of that advantage goes away, but that also depends on whether you participate in a video call every now and then, or if you’re spending most of each day in meetings.
| Scores: Total | |
|---|---|
| Fujifilm | 19 |
| Canon | 21 |
| iPhone SE | 25 |
| iPhone 12 Pro | 24.5 |
Overall, the good news is that it’s possible to increase the quality of your video calls in several ways. It may take more setup and a little extra money, but the results are worth it.







by JR
Excellent article with tons of great info and examples. Just wanted to say I appreciate the content, it was very helpful.
Thank you so much JR!