Как добиться наилучшего освещения во время видеозвонков


Итак, вы хотите лучшее освещение для ваших видеозвонков? Мы тоже. В прошлом мы пробовали множество различных вариантов освещения, чтобы увидеть, что работает лучше всего, когда мы используем Camo. Мы узнали, что вы можете получить некоторые фантастические результаты без профессионального бюджета на производство.
В отличие от поиска лучшего крепления для вашего iPhone , что довольно просто, достижение хорошего освещения немного сложнее и требует изучения небольшой теории. За помощью в этом мы обратились к профессиональному фотографу Джие Гудрич , чтобы поговорить о качествах, которые делают хороший свет. Это Джиа дает обзор в видео ниже.
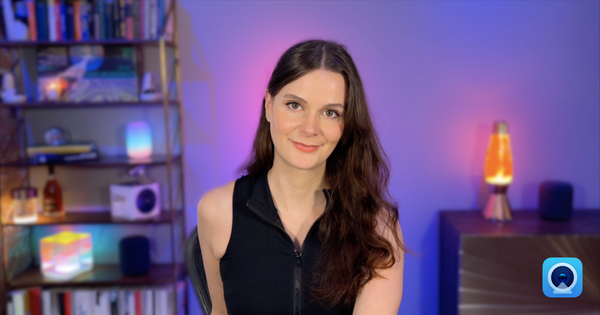
Помимо этого, тип характеристик, которые вы хотите найти в свете, зависит от цели света. Для чего-то вроде видеозвонка, вы можете захотеть включить несколько источников света, как мы делаем в нашем видео об умной лампочке ниже. Если вы посмотрите на установку Джии в ее видео, ее три зоны света: (1) свет, который освещает ее (ключевой свет), (2) свет, который добавляет фиолетово-сиреневый оттенок ее фону (заполняющий свет) и (3) маслянисто-желтый свет лампы и полосового света (контровый свет).
В этой статье мы в основном сосредоточимся на поиске хорошего ключевого света (света, который будет освещать объект, для видеозвонков это вы). Поэтому фон на многих этих иллюстративных изображениях довольно темный и нуждается в дополнительном освещении, чтобы действительно завершить сцену. Вот еще немного информации от Джии о заполняющем свете.
Мы задали Джие много других вопросов, поэтому мы продолжим включать полезный контекст и объяснения, которые она давала на протяжении всей статьи. Для получения дополнительных советов по созданию хорошей настройки освещения у Джии есть чрезвычайно полезный канал на YouTube, посвященный помощи пользователям и создателям видео всех уровней навыков в создании хороших настроек освещения, особенно для решения специфических проблем видеозвонков, таких как предотвращение бликов от освещения при ношении очков .
Учитывая комментарии Джии, у нас есть довольно хорошая отправная точка для начала оценки каждого из этих источников света. С практической точки зрения, конечно, то, насколько хорошо работает источник света, — это всего лишь один кусочек головоломки при поиске света, который будет хорошо работать для видеозвонков, особенно если вы работаете из дома. Хороший свет в этой ситуации должен соответствовать и другим, более практическим критериям.
Чтобы оценить эти огни, мы зададим следующие вопросы:
Насколько хорошо он работает как источник света? Выглядит ли цвет естественным и сбалансированным по дневному свету? Или он размывает объект или дает слишком много тепла? Освещение мягкое или резкое? Достаточно ли оно интенсивное?
Практична ли она в использовании? Легко ли ее настраивать, включать и выключать, сидя за столом? Как она управляется и питается? Нужно ли ее заряжать? Может ли она перегреться? Она шумная? Она слишком яркая?
Вписывается ли он в пространство? Не слишком ли он большой, чтобы поместиться в домашнем офисе? Не слишком ли много кабелей? Можно ли идеально расположить светильник? Можно ли его легко перемещать?
Является ли он экономически эффективным? Если он дорогой, то оправданно ли это или есть более дешевые альтернативы, которые дают аналогичный эффект? Если он бюджетный, то прослужит ли он какое-то время или мне нужно будет его быстро заменить?
Мы дадим каждому светильнику оценку 5 в каждом разделе.
Продукты протестированы
- Софтбокс
- USB-видеолампы
- Подсветка Elgato
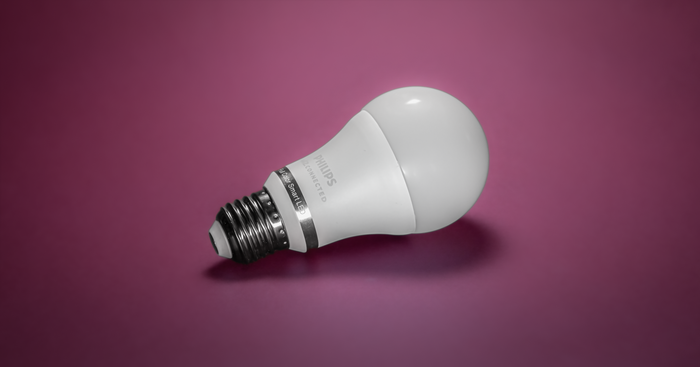
- Умные светодиодные лампы
- Кольцевой свет Kodak
- Светильники Phillips Hue Play
Настраивать
Здесь мы будем тестировать большинство различных вариантов освещения:


Как вы можете видеть на этих изображениях, есть окна позади и справа от стола. Справа вы можете увидеть, как выглядит подача в Camo с этой настройкой и без дополнительного освещения.
В самой комнате много света, но расположение двух окон далеко от идеального. Свет сзади заставляет объект выглядеть темнее фона, а свет сбоку, в то время как свет сбоку создает нежелательные тени на ее лице.
Поэтому первым шагом является контроль как можно большего количества этого света. Одним из вариантов было бы просто работать со светом, повернув стол лицом к одному из окон. Это был бы хороший источник света в этот день и в это время, но мы ищем что-то, что даст нам такие же хорошие результаты в любое время дня или года. Нам также нужно сравнить эти варианты с одной и той же отправной точки, что сложно сделать с естественным светом. Итак, давайте посмотрим, что могут сделать эти светильники сами по себе.


Софтбокс
| Очки: Софтбокс | |
|---|---|
| Свет | 5 |
| Практичность | 4 |
| Космос | 1 |
| Экономически эффективным | 4 |
Используемые продукты


Софтбоксы используются для профессиональных наборов и предлагают лучший (и самый лестный) свет из всех вариантов, которые я тестировал, из-за их размера. Камера внутри софтбокса на самом деле довольно маленькая, но два слоя рассеивания внутри коробки создают большой мягкий свет, достаточно большой, чтобы мягко обволакивать все, что находится на переднем плане.

Мы разместили софтбокс прямо позади и над нашей камерой, а затем наклонили его вниз, чтобы попытаться создать едва заметный эффект освещения Paramount. Паркер Уолбек описывает пять самых популярных схем портретного освещения в своем видео здесь.


Свет, создаваемый софтбоксом, действительно прекрасен. Он мягкий и приятный, и очень яркий, не вызывая дискомфорта у объекта. Цвет на этом нельзя было отрегулировать, но он установлен на хорошую температуру дневного света, не слишком теплый и не слишком холодный. Яркость можно регулировать, и мы установили ее на 75%.
Требуется некоторая сборка, но если вы знакомы с общей конструкцией зонтов, то все будет в порядке. После настройки вы просто включаете и выключаете его с помощью переключателя на задней стороне светильника, и он запоминает ваши последние настройки. Он подключается к сети, но поскольку он предназначен для использования на профессиональных съемках, элементы управления освещением находятся сзади, поэтому вы не можете регулировать яркость со своего стола. У светильника есть вентилятор, предотвращающий перегрев, но он едва достаточно громкий, чтобы его было слышно, и недостаточно громкий, чтобы его услышали большинство микрофонов.
Это практичный вариант? Вероятно, не для большинства из нас. Это действительно огромный комплект. Большинство столов стоят вплотную к стене, поэтому, за исключением того, чтобы каким-то образом закрепить светильник на потолке и отодвинуться от стола для звонков, это не то, что вы могли бы легко использовать. Но если у вас есть место и вы хотите лучшее доступное вам освещение, это оно.
Софтбокс, который мы использовали, состоит из трех частей: свет, коробка и стойка, которые в сумме стоят около $300 (£220). Это дорого для освещения для видеоконференций, но для тех, кому нужен лучший свет, это не слишком дорого.
USB-подсветка для видео
| Партитуры: USB-видео подсветка | |
|---|---|
| Свет | 3 |
| Практичность | 5 |
| Космос | 5 |
| Экономически эффективным | 5 |
Используемые продукты

Свет пришел в упаковке по две штуки , хотя здесь я использую только одну. Вы можете подключить свет к компьютеру через USB-кабель с небольшим набором элементов управления, которые позволяют включать и выключать свет, а также регулировать яркость. Это простой источник света, но сам по себе он выглядит довольно естественно, и им действительно легко пользоваться, находясь за рабочим столом. Подставка выдвигается и поднимается довольно высоко, что удобно.


Хотя свет поставляется со смягчающим фильтром, фильтр находится так близко к источнику света, что он не смягчает свет так же эффективно, как софтбокс. Вы можете видеть это на изображении выше, где на моем лбу увеличен блеск, а также тени, которые часто создают небольшие источники света. Резкий свет также улавливает некоторые недостатки кожи.
Некоторые другие минусы: кабель не очень длинный и немного дешево сделан.
Тем не менее, для варианта, который стоит 45 долларов (32 фунта стерлингов) за две фары, это довольно хороший вариант. Он яркий, цвет подсветки хороший, он компактен, регулируется и удобен в использовании.
Ключевой светильник Elgato
| Ноты: Эльгато ключевой свет | |
|---|---|
| Свет | 3 |
| Практичность | 3 |
| Космос | 4 |
| Экономически эффективным | 2 |
Используемые продукты
Эльгато кей лайт воздух 130 $

Далее я попробовал любимые стримерами, ключевые огни Elgato . Хотя качество самой стойки намного лучше, чем у обычного света, протестированного выше, качество света довольно похоже. У света Elgato та же проблема, что и у обычного света, протестированного выше, а именно, что, хотя он и пытается смягчить свет, рассеивающая секция находится так близко к лампочкам, свет неизбежно оказывается более резким, чем свет от софтбокса.


Нам не понравился опыт использования программного обеспечения Elgato, и мы надеялись, что за эту цену оно будет работать с HomeKit, но этого не произошло. Проблемы с программным обеспечением, похоже, усугубляются при попытке переключения между двумя источниками света, поэтому более крупный источник света выглядит теплее на снимках (мы могли бы исправить это, потратив некоторое время на поиск в Google и пробуя разные вещи, но это показалось нам немного утомительным). С практической точки зрения гораздо менее сложный общий источник света с элементами управления на кабеле работал лучше. Тем не менее, концепция возможности регулировать уровень освещенности и температуру с вашего монитора хороша.
Маленькие и большие лампы Elgato продаются по цене чуть более $100 (£100) и чуть менее $200 (£200) соответственно. Мы не уверены, почему немного большая версия стоит почти в два раза дороже, так как она, похоже, не слишком отличается по характеристикам.
Что нам еще не понравилось: кабель не очень длинный, подставка действительно довольно неуклюжая и ее трудно перемещать, особенно с учетом того, что она предназначена для использования за мониторами.
Умные светодиодные лампы
| Результаты: Умные светодиодные лампы | |
|---|---|
| Свет | 4 |
| Практичность | 4 |
| Космос | 5 |
| Экономически эффективно | 5 |
Используемые продукты
- Лампочки Philips Smart LED 8 Вт по 11,99 фунтов стерлингов за штуку
Что делать, если вы действительно не хотите покупать больше вещей?
Некоторое время назад мы протестировали простую лампу с поворотным кронштейном и обычную лампочку, чтобы сравнить ее с более профессиональными вариантами. Ответ: не так уж и здорово, хотя и немного лучше, чем кольцевая лампа Kodak, которую мы также протестировали для этого руководства. Однако с тех пор мы протестировали несколько различных установок с использованием уже имеющихся у нас бытовых ламп и обнаружили, что можем добиться фантастических результатов, используя всего три программируемых интеллектуальных светодиодных лампы. Вот как мы это сделали.
Тот факт, что эта установка освещения стоит гораздо меньше, чем большинство других альтернатив здесь, и при этом является самой простой в настройке и управлении, ставит эти лампы высоко в нашем списке рекомендаций по освещению. Их показатели люменов могут быть не такими впечатляющими, как у профессионального освещения, которое мы тестировали, но если их расположить достаточно близко к объекту, они давали все, что было необходимо для получения четкого, ясного изображения с хорошей веб-камеры, телефона или беззеркальной камеры (ни одна из них не была на полной мощности в видео).
Возможно, единственное, что удерживает этот вариант от полного поражения с главным призом, это то, что версии, совместимые с Homekit, стоят примерно в три раза дороже, и тот факт, что не у всех может быть столько ламп, сколько было найдено в нашем тестовом офисе. Все лампы, использованные в видео, были куплены на eBay, но если у вас нет времени ходить по аукционам, вы можете добиться того же результата с помощью пары недорогих ламп для задач и светящейся настольной лампы . Создание всей этой установки с нуля — три умные лампочки и три лампы — обойдется в £79 в Великобритании, $100 в США.
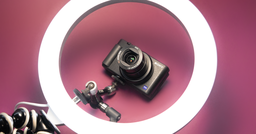
Кольцевой светильник Kodak
| Результаты: кольцевой светильник Kodak | |
|---|---|
| Свет | 2 |
| Практичность | 2 |
| Космос | 2 |
| Экономически эффективным | 1 |
Используемые продукты
- Кольцо Kodak световое 130 $

Кольцевые фонари, кажется, каким-то образом заработали репутацию идеального источника света для телефона и для видеозвонков, поскольку, если вы гуляете по городу, например Лондону, и смотрите в окна (если вы из тех, кто делает это), вы увидите кольцо с такой же вероятностью, как и ваза с фруктами.
В общем, кольцевые фонари практически не так хороши. Вот почему Джиа объясняет:
Мы попробовали кольцевую лампу Kodak, которая была одним из самых дорогих вариантов здесь. Она была в чехле, включавшем крепление для телефона, которое казалось многообещающим для сокращения необходимого места на столе.


Это определенно был худший свет, который я тестировал. Свет был недостаточно сильным, и хотя вы можете переключаться между тремя предустановленными цветами света, даже «нейтральный» вариант кажется немного слишком теплым. Вы можете видеть, что изображение с нашего канала Camo не такое четкое, как большинство других вариантов, поскольку свет просто не дает достаточно света на сцену.
С практической точки зрения этот свет бесит. В то время как телефонное крепление означает, что вам не нужно отдельное крепление для вашего телефона, ножки отказываются делать что-либо, кроме выдвижения, занимая много места на столе.
Подставка не выдвигается очень высоко, что неплохо, если вы используете ее с ноутбуком, но использование ее с большим монитором отключило бы половину света.
Вердикт
| Окончательные результаты | |
|---|---|
| Софтбокс | 14 |
| USB-видеолампы | 18 |
| Подсветка клавиш Elgato | 12 |
| Умные светодиодные лампы Wi-Fi | 18 |
| Кольцевой свет Kodak | 7 |
Для небольших помещений и бюджетов как USB, так и умные лампочки были отличными вариантами. Если у вас на рабочем месте есть две или более ламп, мы настоятельно рекомендуем оснастить их умными лампочками, разместить их в ключевых и заполняющих положениях и настроить их на температуру дневного света и дополнительные уровни яркости, когда вы собираетесь вести видео. Если ваше пространство менее дружелюбно к лампам, использование пары светодиодов с питанием от USB улучшит ваше освещение для видеозвонков и займет минимум места в вашем пространстве. Оба эти варианта можно включать и выключать, а также легко регулировать со стола.
Дополнительные фары
Используемые продукты
Hue Play 150 долларов на двоих
Полоска оттенка $ 80
Хотя мы в основном остановились на ключевых источниках света, у нас было несколько других источников света, которые мы могли бы использовать в качестве заполняющих. Вот быстрый и грубый взгляд на использование других источников света в вашей сцене для создания более интересной световой настройки для видеозвонков.
После того, как вы определились с основным источником света, вы можете подробнее взглянуть на добавление дополнительных слоев света.
Хотя наша сцена неплоха, она немного скучновата. Также есть проблема в том, что оранжевые волосы объекта не слишком отличаются от оранжевых кирпичей, и в кадре много кремового цвета. Чтобы сбалансировать это, мы использовали несколько ламп Hue Play и полосовой свет, чтобы добавить больше оранжевого кирпичам, и разместили розовый свет почти прямо позади объекта, чтобы придать немного розового цвета ее левой стороне. Как мы уже отмечали ранее, светодиодные лампы, такие как Hue, очень легко контролировать и настраивать с телефона, и мы настроили эту сцену за пару минут.

Если у вас будет немного больше времени, вы сможете более критично подумать о том, где вы захотите разместить свет и почему. В идеале каждый слой света, который вы добавляете, должен служить какой-то цели, например, вы можете захотеть создать больше различий между собой и фоном (как это сделала Джиа в своих видео, используя контрастный цвет позади себя), добавить визуального интереса к вашей сцене или убрать тени с вашего лица и под подбородком.
Если вы хотите, чтобы мы рассмотрели какие-либо другие источники света, или если у вас есть другие советы, которые помогут мне улучшить настройку освещения, дайте знать в комментариях ниже (или напишите нам в Twitter @reincubate )


от Frank Kafka
Great article, but next time use a regular person for the photos and not a supermodel.
ответить: Reincubate Support
Scarlet says thank you!