オンライン会議、ストリーミング、ビデオで最高のオーディオを実現する方法

コンテンツの作成、ストリーミング、または単にオンライン会議に参加するだけでも、ワークスペースの音響特性やコンピューターの内蔵マイクの欠点についてはよくご存知でしょう。ほとんどの人にとって、これらは非常に悪い組み合わせです。遮断されたレコーディング スタジオで作業していない限り、ビデオに収録するサウンドは、外の通りの交通騒音、コンピューターのファンの回転音、遠くから聞こえる自分の声の反響、階段を上る足音やマウスのクリック音の役に立たないリズムが混ざり合った、音の乱れ放題になる可能性があります。多くの人にとって、会議中にミュート オプションをオフにすることはまったく無謀な行為です。
あなたの目標があなたのアイデアを視聴者に伝えることであるならば、これは問題です。どの映画製作者やコンテンツ制作者も言うように、サウンドは視覚体験の重要な部分です。それが、すべての映画やテレビ番組制作に専属のサウンド クルーとエディターがいて、その中で最も優れたものを表彰するオスカー カテゴリがある理由です。 『それでも夜は明ける』で飛行機が通り過ぎる音や、『つぐない』の浜辺のシーンでステディカムの機材が回転したりきしんだりする音を想像してみてください。どちらも、魅力的な視聴体験からあなたを引き離したことでしょう。たとえ A リストのタレントや何百人ものエキストラを雇っていなくても、同じことがあなたの動画にも当てはまります。録音したオーディオによって、視聴者とのエンゲージメントが下がることも上がることもあります。
ですから、Camo などのツールを使って映像の品質を向上させる作業を行う一方で、サウンド ミキサーのように考え、オーディオにもう少し注意を払う時期なのかもしれません。つまり、視聴者の気を散らす不要な周囲のノイズを抑えながら、視聴者に聞かせたい音声の明瞭度と品質を高めるということです。幸い、これにはハリウッド並みの予算は必要ありません。追加のハードウェアを購入しなくても改善できる点があり、予算を圧迫しない優れたマイクのオプションもあります。どんな小さな変更でも役立ちますが、マイクのアップグレードと組み合わせてスペースに基本的な変更を加えると、最高の結果が得られます。
このガイドには、次のトピックが含まれています。
携帯電話とコンピュータの内蔵マイクの短い歴史と重大な制限(基本的に、これがそもそもあなたがこれを読んでいる理由です)
使用しているマイクの音質を確認するための簡単な手順
外部マイクを購入する予定があるかどうかにかかわらず、お持ちの空間の音響品質を改善するための実用的な推奨事項
マイクの世界を簡単に探究/解明します。これで、コンデンサーマイクとダイナミックマイク、カーディオイドマイクと無指向性マイクを自信を持って区別できるようになります。
特定のスペースやニーズに最適なマイクを見つけるのに役立つテストと推奨事項
録音中に制御できないバックグラウンドノイズをキャンセルし、後でオーディオ品質を修復または向上するためのいくつかの推奨ソフトウェアソリューション
良い点、悪い点、そして小さい点: スマートフォンとコンピューターの内蔵マイクの短い歴史
今日のスマートフォン、ラップトップ、PC は、最先端の技術を象徴するものであり、強力なチップ技術と驚異的なグラフィック機能が、小型で洗練されたフォーム ファクターに詰め込まれています。比較的新しいチップセットを搭載したラップトップをお持ちの場合、わずか 20 年前にはスーパーコンピューターと見なされていたもの、さらにその 20 年前には DARPA の空想の産物と見なされていたものを持ち歩いている可能性があります。しかし、これらのマシンに何十億ドルもの研究開発費が投入されているにもかかわらず、それらに内蔵されているマイクは、ほぼ 100 年前の固定電話技術から驚くほど変わっていません。
この技術的な不均衡の理由は、歴史的かつ実際的なものです。すべてのマイクの主な機能は、音声の音波や振動を拾って電気信号に変換することですが、電話受信機に搭載されているデバイスは、もともとこれを長距離で実行し、携帯電話の登場により、携帯電話ネットワークに過負荷をかけずに実行することを目的としました。これらのパラメータにより、電話から送信される音の周波数が、人間の聴覚の通常の範囲よりもはるかに狭い帯域幅に制限されました。つまり、聴覚の抑制です。
したがって、人間の耳は 20 ~ 20,000 ヘルツの範囲の音を捉えることができ、人間の声は 100 ~ 17,000 ヘルツの範囲の音を捉えることができますが、古い電話受信機と今日のほとんどの内蔵マイクはどちらも、通常 400 ~ 3,400 ヘルツの範囲しか捉えられません。これは狭帯域または音声帯域と呼ばれ、電話の音声が常に独特の金属的な音質を持つ主な理由です。
時間が経つにつれて、携帯電話がよりスマートになるにつれ、マイク機能は、デバイスの中で継続的に改良されない数少ない部分の 1 つになりました。これは、部分的には純粋な実用性からでした。携帯電話で話している人は、車のクラクション、犬の吠え声、機械の音など、さまざまな音に囲まれていることが多く、マイクの感度を制限すると、実際に不要なノイズの一部を遮断するのに役立ちます。電話のマイクの感度を上げると、単に相手の言っていることが理解しにくくなるだけかもしれません。
実際、ほとんどの携帯電話メーカーや通信事業者にとって、実用的なオーディオの最大の障害は信号の品質であり、両業界は携帯電話が広く安定したネットワークを介して互いに安定して一貫した接続を確保することに多大な注意を払ってきました。通話がまったく聞き取れない、または突然切れるという苦情は、会話中に豊かで充実した音域が欠けていることに関する不満をはるかに上回っていることは間違いありません。
スマートフォンやコンピューターに搭載されているマイクは、小型であまり目立たない機器で、エレクトレットと MEMS の 2 種類があります。MEMS が急速に普及しつつあります。エレクトレットは基本的に非常に小型の全方向性コンデンサー マイク (後述) で、MEMS (MicroElectrical-Mechanical System) はチップにエッチングされたマイクです。どちらも消費電力とスペースをほとんど必要とせず、製造コストも安く、 科学的な実験をするのも楽しいものです。小型で電力消費も最小限であるため、スマートフォンの設計には複数のマイクが組み込まれていることが多く、音源を近くまたは数フィート離れた場所に配置し、電話の両側から音声をキャプチャできます。

ノートパソコンやデスクトップ コンピューターのマイクは、通常、キーボードの下か内蔵カメラの近くにあります。多くは携帯電話で使用されているものとまったく同じですが、もう少し強力なものもあります。いずれにしても、携帯電話のマイクと同じ基本機能、つまり人間の声の一般的な周波数範囲を、ある程度の明瞭度で、さまざまな距離からキャプチャするように設計されています。これは、カジュアルな会話には適しているかもしれませんが、聴衆の目、耳、心とつながるプロフェッショナルな製品を作成しようとしている場合は、あまり適していません。
テスト、1、2、3
私たちの言うことを鵜呑みにしないでください。内蔵マイクが何を拾っているか、そしてあなたの空間と声が他の人にどのように聞こえるかを正確に聞くには、ヘッドフォンが必要です。XLR セットアップをお持ちの場合は、ヘッドフォンをオーディオ インターフェイスの対応するジャックに直接差し込むことができます。USB マイクをお持ちの場合は、その下部にヘッドフォン ポートがある場合があります。ない場合は、ヘッドフォンをコンピューターに直接接続するだけで、ほとんどの Mac および PC に標準装備されているオーディオ機能にアクセスできます。以下のビデオのいずれかをクリックして、必要な手順を確認してください。


プラグを差し込んで準備ができたら、少し時間を取って聞いてみてください。初めて聞く音に驚くかもしれません。何も話さなくても、家の暖房やエアコンの音や階下の洗濯機の音など、いろいろな音が聞こえることに気づくでしょう。机の上で手を動かすと、その音も聞こえるでしょう。ノートパソコンのマイクはキーボードの下にあることが多いので、キーを打つたびに音が大きくなり、トラックパッドやマウスの動きも記録されます。実際、体は口よりもマイクに近いので、不要なノイズを多く除去するには、ほとんど動かずに座っている必要があります。
実際に話すと、自分の声が電気信号に変換され、狭帯域の周波数範囲に送られた後に聞こえることになります。エコーが聞こえる場合は、声帯からの音波が周囲の壁に反射し、より直接的な音波よりほんの一瞬遅れて内蔵マイクに到達しているだけです。これは、特に心地よく、夢中にさせる体験にはなりません。
音響風水:音響空間を改善する
幸いなことに、携帯電話やコンピューターのマイクを改善することはあまりできませんが、作業スペースに物理的な変更を加えることで、ビデオの音質を大幅に改善し、環境を少し快適にすることができます。音響風水と考えるか、聴覚ヒュッゲと考えるかにかかわらず、環境内の家具やその他の素材を慎重に選択して配置することで、新しい機器に1円も費やすことなく、より良いサウンドをキャプチャできます。
作業スペースもそれほど広くありません。自宅のオフィスやスタジオにもう少し広いスペースがあればいいのにと思うかもしれませんが、ビデオの音響環境に関しては、居心地の良さが何よりも大切です。サウンド ブースは、実際に見たことがなくても、映画やテレビ番組で見たことがあるでしょう。サウンド ブースは、壁や天井が灰色または黒色の幾何学的なパネルで覆われ、豪華なマイクと、おそらくスヌープ ドッグが入った小さな部屋です。歌手がコンサートを行う巨大なスタジアムとは対照的かもしれませんが、このような限られたスペースでこそ、サウンドを最もうまくコントロールできます。
そして、この壁のカバーは見た目のためだけのものではありません。音響フォームと呼ばれるこのパネルは、音質を向上させる強力なツールです。素材と形状のおかげで、パネルは音波を吸収または分散し、残響や音の反射を減らします。これにより、いわゆる無響環境が生まれます。つまり、音が壁や天井に当たっても、空気の抜けたバスケットボールのようにどこにも跳ね返りません。マイクに届く音は、歌手や話し手の口から直接発せられる音だけであり、競合したり濁らせたりするエコーはありません。パネルの大きな箱の値段はそれほど高くなく、 英国でも米国でもオンラインで簡単に見つけることができます。
壁や天井の一部または全体をフォームで覆うというステップを踏みたくない人のために、作業スペースの吸音性を向上させる他のオプションがあります。窓のブラインドをカーテンに取り替えたり、椅子にひざ掛けを掛けたり、床に大きなラグを敷いたりすると、音を吸収して反響を減らすのに役立ちます。壁に布を掛けると、音の面だけでなく、 流行に乗ったままでいるという面でも、空間がさらに広がります。これらの変更には、作業スペースがより快適に感じられるようになり、部屋のエネルギー効率が向上するという追加の利点もあります。


布地で硬い表面を断熱したら、次は家具のレイアウトに注意を向けます。デスクが単板ガラスの窓の真正面にあり、カーテンを開けたままにしておきたい場合は、デスクを別の壁に移動することを検討してください。ほとんどの家の窓ガラスは硬くて薄いため、音響共鳴の点ではむき出しの壁よりもさらに悪くなる可能性があります。
部屋の隅も、机を置くのにはあまり適した場所ではありません。音響的に言えば、隅はおそらく作業するのに最悪の場所です。まず、声から発生した音波が両方の壁に当たり、さまざまな角度と速度で激しく反響するため、音波がマイクに当たったときにエコーが増大します。基本的に、部屋の壁は導波管として機能し、部屋の周囲から波を伝導して隅に集中させます。そこに机を置くのはスペースを効率的に活用できるかもしれませんが、音質を向上させる努力がはるかに難しくなります。代わりに、机を別の場所に移動し、クッションやひざ掛けを載せた快適な椅子に置き換えてみてください。それだけではありません。家具、植物、オブジェクトで空間を埋め尽くすと、吸音性が劇的に向上します。
最後に、部屋を外部の邪魔な騒音から遮断することを考えましょう。カーテンを閉めれば、すでにこの目的に役立ちますが、プレゼンテーションやコンテンツ作成のときは、部屋をジェームズ・キャメロンの小さな深海潜水艇だと考えてください。水漏れや過度の騒音は、良い体験の邪魔になります (ご参考までに、ナヴィ語で不要な音は hawmpam です)。ドアと窓を閉め、ドアが床に接していない部分にはすきま風防止シートやタオルを使用するとよいでしょう。そして、録画、ストリーミング、会議の前には、ファンや洗濯機などの外部の騒音をできる限り消してください。コンピューターのファンがうるさい場合は、ソフトウェアを使用して、マシンの温度を下げるようにしてください。
これらすべてにより、録音した音声の品質を向上させることができますが、携帯電話やコンピューターのマイクの周波数範囲と指向性ピックアップ オプションがまだかなり制限されているという事実は変わりません。ビデオのプロフェッショナル品質に匹敵する真にプロフェッショナルなサウンドを録音したい場合は、自分の声に最も近い環境で、声の響きと質感を完全に録音できるように設計されたマイクが必要になります。
マイクの広い世界
この時点で、オーディオ ゲームを次のレベルに引き上げるマイクに投資する準備が整っているかもしれません。いくつかの推奨事項を喜んで提供しますが、先に進む前に、最適なオーディオ ソリューションを探すときに遭遇する用語を簡単に確認しておくと役立つ場合があります。専門用語は最初は難しそうに思えるかもしれませんが、耳にしたり読んだりする用語は、マイクの設計と電源供給の方法、およびマイクが音響情報を収集する方法を区別するだけです。オプションを選択する際に参照できるリストを以下に示します。
ダイアフラム: 音波に反応して振動するマイク内の薄い膜。大きなダイアフラム (直径 1 インチ以上) は低周波応答性に優れているため、音源の音が大きく豊かになります。一方、小さなダイアフラム マイク (1/2 インチ以下) はより自然で詳細な音を捉えます。前者はプロのボーカルによく使用され、後者は楽器やオーケストラに使用されます。
トランスデューサー: 振動を電気信号に変換するマイクロフォンの部分。トランスデューサーの種類によって、次の 3 つのマイクロフォン タイプが分類されます。
コンデンサー: 薄い帯電ダイヤフラムを使用して振動時に電気信号を生成するマイク。感度が高く、周波数応答とダイナミック レンジが広いため、スタジオ環境で繊細な音を拾うのに最適です。
ダイナミック: スピーカーのように、ワイヤーコイルを使用してダイヤフラムで拾った信号を増幅するマイク。通常、コンデンサーマイクよりも壊れにくく(安価)、大きな音や騒がしい空間に最適です。
リボン: コイルではなく、非常に薄いアルミ箔リボンの振動を利用して、正確で詳細なサウンドをキャプチャするマイクです。楽器の録音に最適ですが、通常、高価で非常に壊れやすいです。
ファンタム電源: コンデンサー マイクで使用される DC 電圧電源のタイプ。明らかな電源源がないため、このように呼ばれます。マイクはミキサーまたはオーディオ インターフェイスに接続され、オーディオ信号が流れているのと同じ配線に電圧が流れ、マイクのアクティブ回路に電力が供給されます。これは通常、XLR ケーブルによって有効になり、USB 接続で利用できるものよりも大きく、よりダイナミックなサウンド ファイルのキャプチャも可能になります。
極性パターン: さまざまな方向の音に対するマイクの感度を定義および説明します。以下は、最もよく目にするさまざまなタイプです。
全方向性: 球状の集音パターンで、すべての方向から均等に音を集めます。ほとんどの内蔵マイク (コンピューターに内蔵されているマイクなど) は全方向性です。音源に近い場合、優れた全方向性マイクは、一定の低レベルのバックグラウンド ノイズ (屋外の穏やかで一定の交通音、エアコンの音など) をかなりうまく遮断できますが、ドアを閉める音や犬の吠え声など、一回限りの大きな音を遮断するのにはあまり効果がありません。
カーディオイド: 軸上の音 (マイクが向いている方向) に非常に敏感な単一指向性の極性パターン。一方、側面からの音に対する感度はやや低く、後方からの音は拒否します。比較的制御された環境では、コンピューターのノイズや音の反射から話者の声を分離するのに適しています。
双方向性または図 8 : さまざまなステレオ録音技術でよく使用される極性パターン。すべての極性パターンの中で最も側面の除去率が高いため、90° で漏れ込む音を処理するときに役立ちます。
ショットガン: 指向性の高い極性パターンで、1 つの軸に沿って音の感度が集中し、側面に沿って急激に減衰します。ショットガン マイクは、離れた場所の音を録音するのに優れているため、屋外での撮影に最適です。また、ユーザーが静止していて、マイクをフレームのかなり外側に配置したい家庭のセットアップにも役立ちます。
ラベリア: 極性パターンではなく、通常は衣服に取り付けるタイプの小型マイクで、ハンズフリー操作と機動性の向上を実現します。

もちろん、掘り下げるべき用語や技術的な説明は他にもたくさんありますが、一般的なトランスデューサーの種類と極性パターンを知っておくことは、自分の特定の用途や環境に最適なオプションを探すための良い出発点になります。価格帯は幅広く(10,000ドルを少し超える予算があれば、デュアルラージダイアフラムのマルチパターンステレオチューブコンデンサーであるBrauner VM1Sを購入することもできます)、ここでは主に、プロ並みの予算やベテランのサウンドエンジニアのスキルを必要としないマイクについて見ていきます。予算の限られたオプションでも、スマートフォンやコンピューター単体で実現できる音質をはるかに上回ることができます。
マイクメーカー、マイクメーカー、マイクを合わせてください
さて、新しい技術知識を仕事に活かして、ハードウェアを見てみましょう。ワークスペースと使用ケースの正確なニーズは人それぞれですが、推奨事項をいくつかの主要なカテゴリに分けると便利です。まず、内蔵マイクからステップアップする人にとって確実なステップアップとなる、予算重視の製品から始め、その後、さまざまな目的や環境でプロフェッショナルなサウンド再生を提供するオプションに移ります。
Blue Yeti は、その価格の割に、たくさんの機能を備えたマイクです。実際、このマイクは 4 つのマイクを搭載しており、カーディオイド、無指向性、双指向性 (双指向性)、および「ステレオ」の 4 つの極性パターンから選択できます。これにより、ビデオの作成やポッドキャストのインタビューの直接実施など、複数の用途でマイクを使用する場合に柔軟性が高まります。また、ある日は静かで、次の日は騒がしい場合など、さまざまなオプションがあります。このハードウェアに関しては、「何でもできるが、何ひとつマスターしていない」という表現が適切であることに注意してください。Yeti は、さまざまな用途や空間でかなり優れた機能を発揮しますが、高品質の専用カーディオイドまたは双指向性マイクほど優れているわけではありません。
優れているのは、プラグアンドプレイのシンプルな機能です。Yeti に付属するマニュアルは簡潔さの傑作です。自分で理解できないことがほとんどないからです。USB マイクなので、コンピューターに直接接続して電源を供給します。動作させたり調整したりするために特別なダウンロードは必要ありません。Camo、会議プラットフォーム、およびビデオに使用する他のほぼすべてのソフトウェアですぐに選択できます。
もちろん、これはこのマイクの配置方法や場所に注意を払う必要がないという意味ではありません。ほとんどの場合、カーディオイド モードで使用する場合、Yeti は Blue のロゴがある面を自分の方に向け、口から約 4 インチ (10 cm) の位置に最適に配置されます。通常、机から少し浮かせるためのスタンドが付属していますが、最適な範囲にするには、スタンドを何か他のものに立てかけるか、ブーム アームを使用して口のすぐそばに配置する必要があります (アームまたはショック マウント、またはその両方を使用すると、マイクが拾う可能性のある机からの振動を均一化するのに役立ちま す)。


Yeti を適切に設置し、ゲインを調整すれば、内蔵マイクで録音できるものよりはるかに優れたオーディオが得られます。オーディオのプロが「ニュアンスのある」と呼ぶような音ではありませんが、周波数がクリップされることはなくなるでしょう。Yeti の周波数範囲は 20 ~ 20,000 Hz で、人間の聴覚の全範囲を網羅しています。さらにサウンドを最適化したい場合は、Yeti のメーカーである Logitech が、 G Hubから無料でダウンロードできる Blue Vo!ce ソフトウェアを提供しています。まだ試していませんが、Logitech は、さまざまなノイズ フィルタリングと音声ブースト技術によって「スタジオ品質の音声通信」が可能になると約束しています。独自のソフトウェアを使用しなくても、Blue Yeti を最適な位置に配置すれば、その価格をはるかに上回るパフォーマンスが得られることがわかりました。
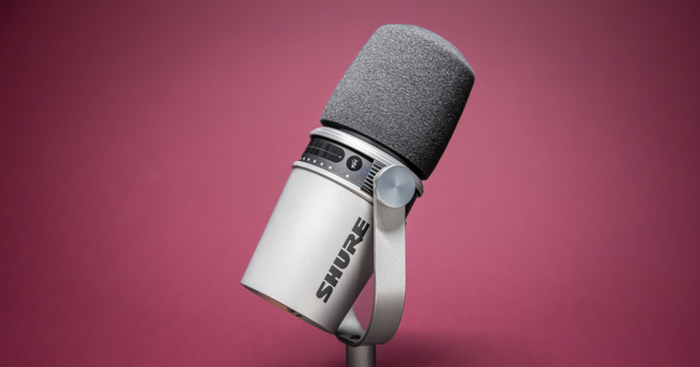
イエティから品質(と価格)が確実に向上したのが、シュア MV7 です。このダイナミック カーディオイド マイクが、多くの人気ストリーミングやビデオのフレームに登場しているのには理由があります。豊かでプロフェッショナルなボーカル サウンドを再現し、シュア独自の MOTIV アプリを使用して簡単に調整でき、USB または XLR のいずれかで電源を供給できるからです。軸外ノイズを強力に排除するため、理想的とは言えない音響条件でも使用できます。イエティ、または実際のところどのマイクでも、最高のサウンドをキャプチャするには、正しく取り付けて調整する必要があります。
MV7 は上端から直接音を収集するため、口に直接向けるように取り付ける必要があります。スイート スポットは顔からわずか数インチですが、フレーム内で大きく映り込みたくない場合は、約 18 インチまで拡張できます (マイクから離れるほど、周囲のノイズが多く拾われることに注意してください)。Yeti と同様に、マイク自体のヘッドフォン ジャックから直接モニタリングできます。
MV7 を USB 経由で接続すると、無料の ShurePlus MOTIV アプリがマイクのキャリブレーションをうまく行うので、すぐに使い始めて安定したサウンドを得ることができます。「自動レベル」を選択するだけで、マイクが近くに取り付けられているか (1 ~ 6 インチ) 遠くに取り付けられているか (6 ~ 18 インチ)、そして声のトーンを暗い、自然な、明るいのどれにするかをアプリに知らせるだけで済みます。
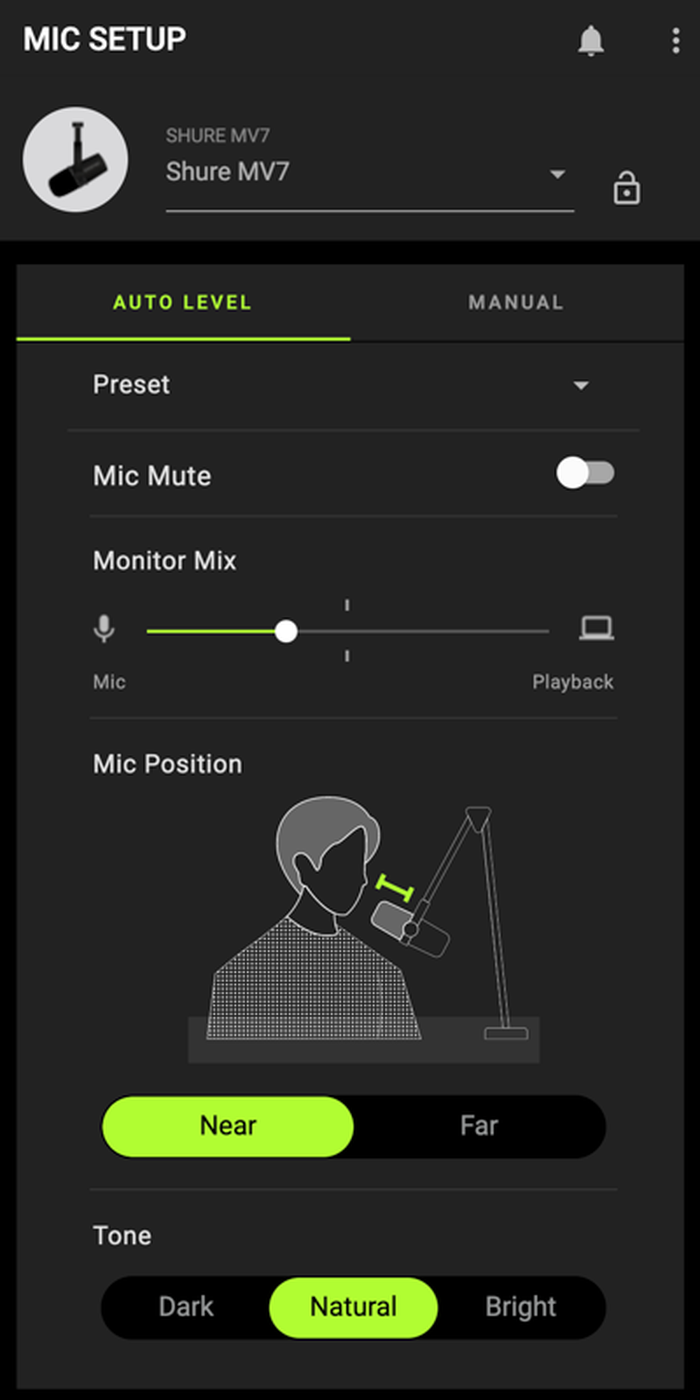
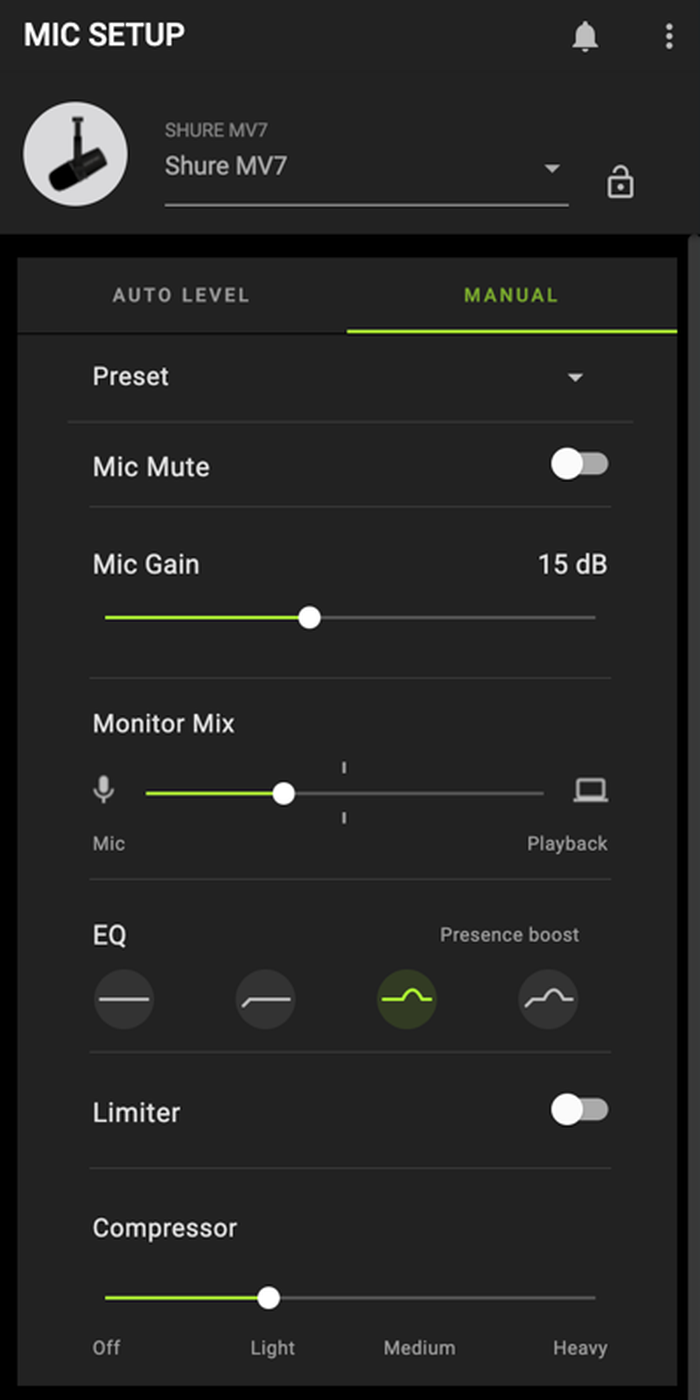
「手動」を選択すると、ヘッドフォンを接続してより能動的な制御が可能になります。ゲインを設定したり、イコライザー設定を選択して特定の周波数帯域の音量を調整したり、リミッターをアクティブにして突然の音量の急上昇を防いだり、コンプレッサーを上げてオーディオ信号の最も弱い要素と最も強い要素の間の範囲を狭めたりすることができます。そして、それをすべてプリセットに保存できます。
MV7 の USB 接続とコントロールで十分満足できると思いますが、対面インタビューや音楽演奏、指導などにビデオを使用する場合は、代わりに XLR ケーブルとオーディオ インターフェイス ( Scarlet 2i2がお勧め) で電源を供給することもできます。これだけでは、音質が大幅に向上するわけではありません (そのためには、より強力なプリアンプを備えたより高価なオーディオ インターフェイス、またはCloudlifterのようなブースターが必要になります)。ただし、追加のマイクで録音できるようになります。XLR 接続では、高解像度のオーディオ ファイルも生成されるため、ポストでサウンド編集を行う場合に役立ちます。
 が付属していますが、口の近くに配置する場合は、より長い Shure SM7A または SM7B ウインドスクリーン (右側) に交換すると、破裂音のパフォーマンスが大幅に向上します。")
USB のシンプルさにこだわるにしても、ファンタム電源を全面的に採用するにしても、Shure MV7 は、内蔵マイクだけでなく、他の USB マイクと比べても、サウンドを大幅に向上させます。唯一の欠点は価格です。約 250 ポンド/270 ドルと安くはありませんが、予算に余裕があれば、これまでで最高の買い物の 1 つになるかもしれません。
RØDE NT1-A (キット価格:約150 ポンド/ 200 ドル)
コンデンサー マイクは繊細な魂です。物理的には非常に繊細で、ほとんどの場合、静かな場所で作業する必要があります。しかし、少しの特別なケアと調整を行うことで、低周波数と高周波数の両方をクリアに再現する、素晴らしく歪みのないニュアンスのあるサウンドが得られます。ライブ コンサートの演奏でない限り、プレイリストのトップ ソングはすべてコンデンサー マイクで録音された可能性があります。博物館では、コンデンサー マイクをコレクションに保管しています。コンデンサー マイクがなければ、アビー ロードはアビー ロードではありません。
もちろん、スタジオでの音楽制作にコンデンサー マイクが優れている理由は、ポッドキャスト、ストリーミング、ビデオ会議など、他の用途には適さないからです。話しているとき、リスナーは唇の音や花粉症の鼻をすする音をすべて聞き取ってしまう可能性があります。また、部屋の防音対策が適切でなければ、周囲の雑音やエコーが、まるで不要なバック シンガーのようにスピーチに付きまといます。
したがって、私たちが選んだ最高のコンデンサー マイクは、主に防音対策の行き届いた空間にいる歌手やミュージシャン向けです。コンデンサー マイクの感度は、最も静かな音でも驚くほど明瞭に捉えるのに最適ですので、ASMR クリエイターであれば注目してください。
さて、RØDE NT1-A です。Yeti や MV7 とは異なり、このマイクは長い間存在しています。実際、何十年もの間、多くのスタジオで使用されてきました。また、レビューした他のマイクには、タッチ コントロール、ダイヤル、ボタン、ライトが多数搭載されていますが、NT1-A は、堅牢で金属的なシンプルさのモデルです。箱から取り出してすぐに、すぐに使い始めることができます。
コンデンサー マイクである NT1-A にはファンタム電源が必要なので、XLR ケーブルとオーディオ インターフェイスが必要です。また、適切な取り付け方法も必要です。カーディオイド極性パターンは、前面と側面からの音を収集するため、話したり、歌ったり、演奏したり、ASMR 素材を扱ったりするときに、側面の金属点が自分に向くように、約 4 ~ 6 インチ離して配置する必要があります。最後に、破裂音だけでなく、マイクの音を耳障りにする s、z、sh の子音である歯擦音にも対処できるように、ポップ フィルターを入手することをお勧めします。
電源に接続し、マウントし、オーディオ インターフェイスのゲインを調整すると、NT1-A は鮮明で明るいサウンドを驚くほど詳細に再現します。これは最高級のマイクではありませんが、マイク、ショック マウント、ポップ フィルター、XLR ケーブルで150 ポンドという価格を考えると、多くのコンデンサー マイクよりも優れた耐久性と優れたパフォーマンスが得られます (落とすことはお勧めしませんが、少なくとも誰かが近づくたびに血圧が上がることはありません)。価格、プロフェッショナルなサウンド、安心感 - これら 3 つの理由から、RØDE NT1-A はコンデンサー マイクのカテゴリでトップの選択肢となっています。
ソフトウェアCPR
もちろん、ビデオには常に予測できない要素が存在します。最もプロフェッショナルなサウンドおよびビデオ チームでもミスを犯しますし、最も入念にリハーサルされたビデオでも、正しく仕上げるには何度もテイクを繰り返す必要があります。マイクに可能な限り最高のオーディオを直接取り込むことをお勧めしますが、それが不可能な場合でも、困難な状況を克服したり、基準に達していないオーディオを救済したりできるソフトウェア オプションがいくつかあります。
1 つ目はノイズキャンセリングです。自宅で仕事をしている場合、特に子供やペットがいる場合は、予期せぬ中断について言うまでもありません。ドアをノックされるとペットがヒステリックに吠え始めたり、兄弟の口論が激しい戦いにエスカレートしたり、静かな通りが突然クラクションの大騒ぎになったりすることがあります。このような場合、ノイズキャンセリングが役立ちます。優れたオプションの 1 つはKrispと呼ばれ、気の利いた AI を使用して音声の明瞭度を向上させ、アルゴリズムによってエコーを除去し、バックグラウンド ノイズをリアルタイムでマスキングします。
ノイズキャンセリングの観点から見ると、結果はかなり良好です。面白いレビューもいくつかあり、実際に試してみた結果、かなり使いやすく、Zoom やその他の会議プラットフォームのノイズ抑制オプションよりも確実に優れていると言えます (これらはデフォルトで有効になっていることが多く、Krisp やその他の専門的なノイズキャンセリングを使用している場合は、設定で無効にすることをお勧めします)。ただし、特定の不要な音や周波数をターゲットとするソフトウェア ソリューションは、必要な音質にほぼ必然的に影響を与えるため、スペースに注意を払ってマイクを最適化せずにソフトウェア ソリューションに完全に依存しても、効果は限られることに注意してください。Krisp は、有効にしたときに背景ノイズをブロックするのに効果的でしたが、ユーザーの声の音質も変化しました。特に、キャンセルする周波数が話者の声と範囲が似ている場合は顕著でした。
このため、このソフトウェア ソリューションは、バックグラウンド ノイズが多すぎることが避けられないオンライン会議に主におすすめです。常にオンにしておく必要はありません。Camo を使用している場合は、Camo Studio のデバイス リストから Krisp を選択するだけで、必要なときにノイズ キャンセルをオンにできます。Krisp は Mac と Windows の両方でダウンロードでき、無料版では、1 日最大 60 分間、基本的なバックグラウンド ノイズ、音声、エコー キャンセルを使用できます。
動画を録画した後のオーディオの応急処置として、私たちは Descript のStudio Soundを大いに活用しています。残留リバーブがほんのわずかでも残っていたり、録画中に気づかなかったバックグラウンド ノイズがあったりしても、通常は Studio Sound に通して動画を再生するだけで、しわが取れて、満足できる最終製品が完成します。10 分以内の動画ファイルであれば無料で使用できます。その後、Descript のフル機能とともに動画の長さを無制限にするかどうかは、ご自身で決めてください。
これで完了です。空間を柔らかくすることから、マイクの選択と設定、ソフトウェアを使用したオーディオの修復やブーストまで、見た目と同じくらい良いサウンドのビデオを作成するために必要なスキルがすべて揃いました。ミュートをオフにすることを忘れないでください。また、可能であれば、オーディオを改善するために何をしたかをお知らせください。追加のマイクとソフトウェアを試すときにこのガイドを再確認しますので、他にテストまたは試して欲しいことがあれば、ぜひお知らせください。